一 升级前检查
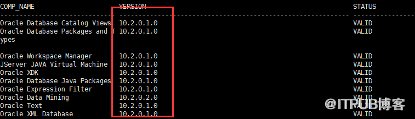
1.1 系统组件检查
SQL> select comp_name,version,status from dba_registry;
升级前需要确保所有组件以及系统对象有效。
1.2 生产库无效对象检查
sqlplus “/as sysdba”
spool invald.lst
select owner,object_name,object_type,status from dba_objects where status<>'VALID';
select status,count(*) from dba_objects group by status;
create table invalid_object_20170627 as select * from dba_objects where status<>'VALID';
1.3 SYS 和SYSTEM 重复对象检查
SQL> select object_name, object_type from dba_objects where (object_name,object_type) in (select object_name,object_type from dba_objects where owner = 'SYS') and owner = 'SYSTEM';
OBJECT_NAME OBJECT_TYPE
------------------------------ -------------------
AQ$_SCHEDULES TABLE
AQ$_SCHEDULES_PRIMARY INDEX
DBMS_REPCAT_AUTH PACKAGE
DBMS_REPCAT_AUTH PACKAGE BODY
以上为正常并且系统允许重复的对象。
二 创建回退方案
Oracle recommends that you create a backup of the Oracle Inventory, Oracle 10g home and Oracle 10g Database before you install the patch set.
2.1 备份ORACLE_BASE
shutdown immediate ;
tar –cvf base.tar $ORACLE_BASE
如果 控制文件 数据文件 日志文件 都在$ORACLE_BASE 下面,则不用备份其他。
如果 不在,他们冷备用分到其他目录下。
再备份下oraInventory 文件(cat /etc/oraInst.loc 可以查看)
#####
查找reodo 文件:
SQL> select group#,member from v$logfile;
查找控制文件:
SQL> show parameter control_files;
三 数据库升级
3.1 10.2.0.5 软件安装
关闭数据库:
isqlplusctl stop ##oracle 用户
emctl stop dbconsole
lsnrctl stop
shutdown immediate;
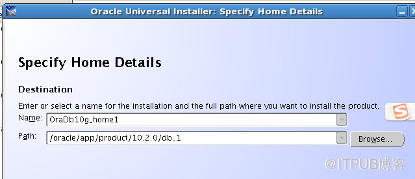
解压10.2.0.5 安装包,
cd Disk1/
./runInstalle
直接覆盖原目录
3.2 升级数据字典。
预检
SQL> SPOOL upgrade_info.log
SQL> @?/rdbms/admin/utlu102i.sql
SQL> SPOOL OFF
刷字典
SQL> SPOOL patch.log
SQL> @?/rdbms/admin/catupgrd.sql
SQL> SPOOL OFF
SQL> SHUTDOWN IMMEDIATE
SQL> STARTUP
#### 一个小时多
3.3 检查数据库升级状态
检查数据库组建状态:
select comp_name,version, status from dba_registry;
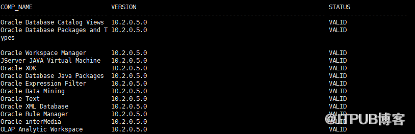
如果升级成功,继续打psu
四 打 PSU
4.1 打补丁前检查
4.1.1 Opatch 版本
OPatch 10.2 version 10.2.0.5.0 or later to apply this patch
4.1.2 检测补丁是否冲突
export PATH=$PATH:/usr/ccs/bin
是否补丁有冲突
修改profile
export PATH=$PATH:$ORACLE_HOME/OPatch
unzip p16619894_10205_
opatch prereq CheckConflictAgainstOHWithDetail -phBaseDir ./16619894
4.2 安装
cd 16619894
opatch apply
4.3 打完补丁调整 scn 参数
psu
打完之后调整这两个参数
alter system set "_external_scn_rejection_threshold_hours"=1 scope=spfile sid='*';
alter system set "_external_scn_logging_threshold_seconds "=600 scope=spfile sid='*';
4.4 补丁回退
cd $ORACLE_HOME/rdbms/admin
sqlplus /nolog
SQL> CONNECT / AS SYSDBA
SQL> STARTUP
SQL> @catbundle_PSU_
SQL> -- Execute the next statement only if this is the first PSU applied for 10.2.0.5 or this is the first PSU applied since 10.2.0.5.3.
SQL> @utlrp.sql
SQL> QUIT
五 升级失败回退操作
Use SQL*Plus to log in to the database as the SYS user with SYSDBA privileges:
$ sqlplus / assysdba
SQL> SHUTDOWN IMMEDIATE
SQL> EXIT
Take a backup of the following file in 10.2.0.5 Oracle home directory:
$ ORACLE_HOME/rdbms/admin/catrelod.sql
$ ORACLE_HOME/network/admin/tnsnames.ora
Enter the following SQL*Plus commands:
$ cd $ORACLE_HOME/bin
$ ./sqlplus /NOLOG
SQL> CONNECT SYS AS SYSDBA
Enter password:SYS_password
SQL> STARTUP DOWNGRADE
SQL> SPOOL downgrade.out
SQL> @?/rdbms/admin/catdwgrd.sql
SQL> SPOOL OFF
SQL> SHUTDOWN IMMEDIATE
SQL> EXIT
Review the downgrade.out file for errors.
Restore the Oracle10g installation and Central Inventory (see /etc/oraInst.loc) that you backed up before applying the patch set.
After restoring the original Oracle home, copy the saved version of catrelod.sql script into the restored Oracle home rdbms/admin directory. Also copy the saved version of 10.2.0.5/network/admin/tnsnames.ora directory into the restored Oracle home/network/admin/tnsnames.ora directory, and then perform the following steps:
$ sqlplus /NOLOG
SQL> CONNECT SYS AS SYSDBA
Enter password:SYS_password
SQL> STARTUP DOWNGRADE
SQL> SPOOL catrelod.out
SQL> @?/rdbms/admin/catrelod.sql ### 时间半个多小时##
SQL> SPOOL OFF
SQL> SHUTDOWN IMMEDIATE
SQL> STARTUP
SQL> @?/rdbms/admin/utlrp.sql
SQL> SELECT COMP_NAME, VERSION, STATUS FROM SYS.DBA_REGISTRY;