linux 6、7、8在线安装MySQL
========================================================================================
-- linux 6、7、8在线yum安装MySQL
# linux 6.5安装 MySQL 5.1
yum list | grep mysql
yum install -y mysql-server mysql mysql-devel
rpm -qi mysql-server
service mysqld start
#repo下载
https://dev.mysql.com/downloads/
https://dev.mysql.com/downloads/repo/yum/
http://repo.mysql.com/
http://repo.mysql.com/yum
#安装文档
https://dev.mysql.com/doc/mysql-yum-repo-quick-guide/en/#repo-qg-yum-platform-specifics
# rpm -Uvh https://repo.mysql.com//mysql80-community-release-el8.rpm  # linux8
rpm -Uvh https://repo.mysql.com//mysql80-community-release-el7.rpm  # linux7
# rpm -Uvh https://repo.mysql.com//mysql80-community-release-el6.rpm  # linux6
yum clean all
yum makecache
rpm --rebuilddb
# /etc/yum.repos.d/mysql-community.repo
yum repolist all | grep mysql
yum-config-manager --disable mysql80-community
yum-config-manager --enable mysql57-community
# linux 8
#dnf config-manager --disable mysql80-community
#dnf config-manager --enable mysql57-community
yum repolist enabled | grep mysql
# linux 8执行
yum module disable mysql
#yum remove -y mysql-community-*
# rm -rf /var/lib/mysql/*
yum install -y mysql-community-server
systemctl start mysqld
#service mysqld start
systemctl status mysqld.service
#service mysqld status
# mysql_secure_installation
# linux 6
# chkconfig --list | grep mysqld
# chkconfig mysqld on
rpm -qi mysql-community-server
日志文件:/var/log/mysqld.log
数据文件:/var/lib/mysql/
grep 'temporary password' /var/log/mysqld.log
mysql -uroot -p
ALTER USER 'root'@'localhost' IDENTIFIED BY 'lhr';
SHOW VARIABLES LIKE 'validate_password%';
# SHOW STATUS LIKE 'validate_password%';
set global validate_password_policy=0;
# set global validate_password_policy=LOW;
# set global validate_password_length=6;
show plugins
UNINSTALL PLUGIN validate_password;
========================================================================================
mysql -uroot -p -P3306
--5.5、5.6、5.7修改密码和允许远程登陆
update mysql.user set Host='%' where Host='127.0.0.1';
--update mysql.user set Host="%" where Host="localhost";
update mysql.user set password=password('lhr') where user='root';
update mysql.user set authentication_string=password('lhr') where user='root';
set password=password('lhr');
grant all privileges on *.* to root@'%' identified by 'lhr'  WITH GRANT OPTION;
grant all privileges on *.* to root@'localhost' identified by 'lhr'  WITH GRANT OPTION;
flush privileges;
select user,host,grant_priv,super_priv from mysql.user;
--8.0修改密码和允许远程登陆
create USER 'root'@'%' identified by 'lhr';
ALTER USER 'root'@'%' IDENTIFIED WITH mysql_native_password BY 'lhr';
ALTER USER 'root'@'localhost' IDENTIFIED WITH mysql_native_password BY 'lhr';
grant all on *.* to root@'%' WITH GRANT OPTION;
grant all on *.* to root@'localhost' WITH GRANT OPTION;
flush privileges;
select user,host,grant_priv,super_priv,authentication_string,password_last_changed from mysql.user;
--mysql 8.0远程连接,在参数文件的[mysqld]下添加:
default_authentication_plugin=mysql_native_password
# 卸载mysql
# systemctl stop mysqld
# service mysqld stop
# yum erase mysql -y
# rpm -qa | grep -i mysql
# rpm -e mysql-community-common --nodeps
# yum remove -y mysql-community-*
# rm -rf /var/lib/mysql
========================================================================================
更新软件
yum update
下载和添加仓库
wget http://repo.mysql.com/mysql-community-release-el7-5.noarch.rpm
sudo rpm -ivh mysql-community-release-el7-5.noarch.rpm
yum update
安装MySql
yum install mysql-server
systemctl start mysqld
配置MySql
运行如下脚本文件
mysql_secure_installation
提示输入root密码,初始为null,回车就可以设置root密码了
之后提示一连串的问题,根据需要自己选择y 或者 n吧
连接MySql
mysql -uroot -p
查看MySql的编码并修改
#查看mysql的编码mysql>show variables like '%character%';
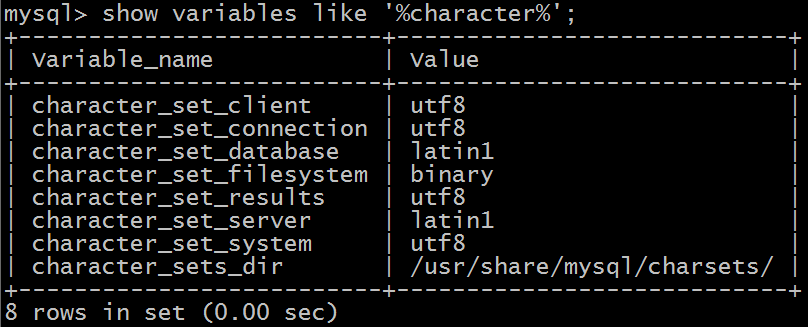
可以看到database和server编码都为latin1,我们修改为utf8
#1.将my-default.cnf 拷贝到 /etc/my.cnf 根据情况找到自己的目录
cp /usr/share/doc/mysql-community-server-5.6.31/my-default.cnf /etc/my.cnf
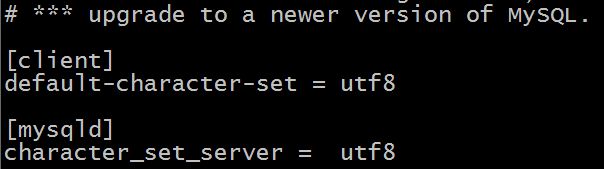
#2.编辑/usr/my.cnf在[client](如果没有就自己加)下增加
default-character-set = utf8mb4
#3.编辑/usr/my.cnf在[mysqld]下增加
character_set_server = utf8mb4
#4.重启MySql服务 这句代码和之前使用的net start mysql作用应该是一样的 开启服务 centos7使用以下代码
systemctl restart mysql.service
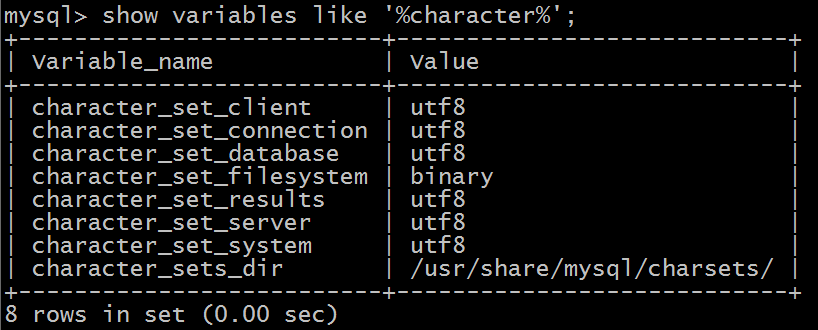
#5.重现连接mysql并查看编码如下:
mysql -uroot –proot
mysql>show variables like '%character%';
允许远程登录
用root用户登录mysql
GRANT ALL PRIVILEGES ON *.* TO 'root'@'%' IDENTIFIED BY 'root';
FLUSH PRIVILEGES;
开放3306端口
firewall-cmd --zone=public --add-port=3306/tcp --permanent
firewall-cmd --reload
CenterOS7在线安装mysql5.7
首先打开mysql官网 https://dev.mysql.com/
因为官网是不断更新的,包括页面展示和文档资料,

在官网首页你能看到mysql的很多官方信息,首页也是导航页,点击你想访问的地方。


进入DOWNLOADS的页面,mysql官方提供了多种安装途径


我选择的是Yum Repository安装,因为我的系统是CenterOS的。

怎么选择需要你有一些linux的基础,你可以查下Red Hat和CenterOS的关系和区别,我建议你把上面那几个不同类型的仓库都看下,查查资料,如果你对linux不熟悉的话,这就是你学习的过程,如果你感觉看着痛苦那就对了,说明你在进步,你在往上走。

这里就有个官方提供的安装教程,点进去。
官方教程写的很清楚,第一步就是要添加mysql的Yum仓库。

添加之前可以先看下有没有mysql的yum仓库,查看指令官方教程也有提供,在下面。
因为是个人使用,为了方面可以直接使用root用户操作,就不用使用sudo了。
[root@zookeeper-1 alan]# yum repolist all |grep mysqlExisting lock /var/run/yum.pid: another copy is running as pid 3481.Another app is currently holding the yum lock; waiting for it to exit...The other application is: PackageKitMemory : 164 M RSS (1.0 GB VSZ)Started: Sun Jun 9 21:35:43 2019 - 01:00 agoState : Sleeping, pid: 3481Another app is currently holding the yum lock; waiting for it to exit...The other application is: PackageKitMemory : 164 M RSS (1.0 GB VSZ)Started: Sun Jun 9 21:35:43 2019 - 01:02 agoState : Sleeping, pid: 3481Another app is currently holding the yum lock; waiting for it to exit...The other application is: PackageKitMemory : 164 M RSS (1.0 GB VSZ)Started: Sun Jun 9 21:35:43 2019 - 01:04 agoState : Sleeping, pid: 3481
可以看到yum指令被锁了,因为有个进程在使用,pid 3481。你可以等会儿,等锁释放,当然你也可以把这个进程给杀掉,我这里是一个python的进程在后台使用yum指令,我就直接kill了。然后执行了上面的命令,什么都没有。

所以先要添加mysql的yum仓库,官方文档给了命令行格式,上面那个是一个具体版本的命令demo。这个版本挺新的,因为这个官方文档也就是两天前才更新的,但我还是去下载页下个最新的吧。


我就使用这个版本 mysql80-community-release-el7-3.noarch.rpm
MD5: 893b55d5d885df5c4d4cf7c4f2f6c153,等下我校验一下
先执行命令
[root@zookeeper-1 alan]# rpm -Uvh mysql80-community-release-el7-3.noarch.rpm
error: open of mysql80-community-release-el7-3.noarch.rpm failed: No such file or directory
报错了,没有这个文件,但这个文件资源肯定是有的,为什么,再仔细看看官方文档

那就是这个mysql Yum仓库版本不支持在我系统里这样在线添加。
官方文档也提供了本地添加的方法,就是先把mysql80-community-release-el7-3.noarch.rpm下载下来,再添加。点击上图的链接。

下载文件就用wget指令,链接是什么呢?就是你通过浏览器下载的链接。下面的操作你要不知道,只能说明你的基本功有点薄弱,要补。把鼠标放在下载链接上就有地址。


下载结果
[root@localhost alan]# wget https://dev.mysql.com/get/mysql80-community-release-el7-3.noarch.rpm--2019-06-09 20:50:25-- https://dev.mysql.com/get/mysql80-community-release-el7-3.noarch.rpmResolving dev.mysql.com (dev.mysql.com)... 137.254.60.11Connecting to dev.mysql.com (dev.mysql.com)|137.254.60.11|:443... connected.HTTP request sent, awaiting response... 302 FoundLocation: https://repo.mysql.com//mysql80-community-release-el7-3.noarch.rpm [following]--2019-06-09 20:50:26-- https://repo.mysql.com//mysql80-community-release-el7-3.noarch.rpmResolving repo.mysql.com (repo.mysql.com)... 23.56.25.233Connecting to repo.mysql.com (repo.mysql.com)|23.56.25.233|:443... connected.HTTP request sent, awaiting response... 200 OKLength: 26024 (25K) [application/x-redhat-package-manager]Saving to: ‘mysql80-community-release-el7-3.noarch.rpm’100%[==================================================================================================>] 26,024 --.-K/s in 0.02s2019-06-09 20:50:26 (1.05 MB/s) - ‘mysql80-community-release-el7-3.noarch.rpm’ saved [26024/26024]
可以校验一下下载文件真伪
openssl dgst -md5 mysql80-community-release-el7-3.noarch.rpm

使用openssl的摘要算法md5对下载文件的计算的md5值与官方提供的值一致。
接下来安装
yum localinstall mysql80-community-release-el7-3.noarch.rpm

你可以再使用yum repolist all |grep mysql查看,这时就有了mysql的yum仓库了。

但是只有mysql80-community/x86_64是可用的,但是我想安装的是mysql5.7的,也就是在他上面,但是是不可用的。这点官方文档说的很清楚,怎么做官方文档也写的清楚。

如果你要安装最新的发行版本,你就无需配置,直接使用yum install就可以。但是如果你要安装一个低于最新版本的指定的mysql版本。你需要将最新的发行版本置为失效,将指定版本置为可用。
官方提供了两种方法,命令行或者修改/etc/yum.repos.d/mysql-community.repo文件。
我通过指令完成修改
yum-config-manager --enable mysql57-community
yum-config-manager --disable mysql80-community
查看修改结果
yum repolist enabled | grep mysql

接下来安装mysql
yum install mysql-community-server

使用yum install在线安装mysql,有个download和intsall的过程,download过程可能时间长些,这取决你的网速。具体进度在命令执行完后打印在控台上的日志中可以看到,安装过程中会有些交互,需要你输入确认y。
安装完成后,启动你的mysql服务,然后查看是否启动成功。


首次安装启动成功之后,mysql做了哪些初始化工作,你怎么登陆,密钥是什么,接下来的官方文档都写的很清楚。

可以看到超级用户账号'root'@'localhost已经创建,你需要在/var/log/mysqld.log文件中找到它,然后登陆。


登录成功后必须先修改密码,而且新密码是有要求的,文档中有说明。


完成密码重置后,你可以先退出exit,然后用新的密码登录,是可以的。
这样mysql的基本安装就完成了,关于mysql的其他使用,如使用yum安装mysql其他产品和组件、升级mysql等等更多信息或注意事项请参考官方文档。
关于mysql的使用和管理官网都有详细的文档,比任何人写的mysql使用手册都要权威。
比如,你想从客户端连接mysql。


A Quick Guide to Using the MySQL Yum Repository
Abstract
The MySQL Yum repository provides RPM packages for installing the MySQL server, client, and other components on Linux platforms. The packages also upgrade and replace any third-party MySQL packages installed from the Linux distros' native software repositories, if replacements for them are available from MySQL.
The MySQL Yum repository supports the following Linux distributions:
-
EL6, EL7, and EL8-based platforms (for example, the corresponding versions of Oracle Linux, Red Hat Enterprise Linux, and CentOS)
-
Fedora 30 and 31
Not all versions of MySQL are supported on all these Linux distributions. See Selecting a Release Series on how to determine if your Linux distribution supports a particular version.
This is a quick guide to using the MySQL Yum repository. For more information, see Further Readings.
For legal information, see the Legal Notices.
For help with using MySQL, please visit the MySQL Forums, where you can discuss your issues with other MySQL users.
Document generated on: 2020-03-31 (revision: 65538)
Steps for a Fresh Installation of MySQL
The following instructions assume that MySQL is not already installed on your system using a third-party-distributed RPM package; if that is not the case, follow the instructions given in Replacing a Native Third-Party Distribution of MySQL.
-
Adding the MySQL Yum Repository
First, add the MySQL Yum repository to your system's repository list. Follow these steps:
-
Go to the download page for MySQL Yum repository at https://dev.mysql.com/downloads/repo/yum/.
-
Select and download the release package for your platform.
-
Install the downloaded release package with the following command, replacing
platform-and-version-specific-package-namewith the name of the downloaded package:shell> sudo rpm -Uvh platform-and-version-specific-package-name.rpm
For example, for version
nof the package for EL6-based systems, the command is:shell> sudo rpm -Uvh mysql80-community-release-el6-n.noarch.rpm
NoteOnce the release package is installed on your system, any system-wide update by the yum update command (or dnf upgradefor dnf-enabled systems) will automatically upgrade MySQL packages on your system and also replace any native third-party packages, if Yum finds replacements for them in the MySQL Yum repository. See Upgrading MySQL with the MySQL Yum Repository and Replacing a Native Third-Party Distribution of MySQL for details.
-
-
Selecting a Release Series
When using the MySQL Yum repository, the latest GA release of MySQL is selected for installation by default. If this is what you want, you can skip to the next step, Installing MySQL with Yum.
Within the MySQL Yum repository ( https://repo.mysql.com/yum/), different release series of the MySQL Community Server are hosted in different subrepositories. The subrepository for the latest GA series (currently MySQL 8.0) is enabled by default, and the subrepositories for all other series (for example, the MySQL 5.7 series) are disabled by default. Use this command to see all the subrepositories in the MySQL Yum repository, and see which of them are enabled or disabled (for dnf-enabled systems, replace yum in the command with dnf):
shell> yum repolist all | grep mysql
To install the latest release from the latest GA series, no configuration is needed. To install the latest release from a specific series other than the latest GA series, disable the subrepository for the latest GA series and enable the subrepository for the specific series before running the installation command. If your platform supports the yum-config-manager or dnf config-manager command, you can do that by issuing, for example, the following commands, which disable the subrepository for the 8.0 series and enable the one for the 5.7 series; for platforms that are not dnf-enabled:
shell> sudo yum-config-manager --disable mysql80-communityshell> sudo yum-config-manager --enable mysql57-community
For dnf-enabled platforms:
shell> sudo dnf config-manager --disable mysql80-communityshell> sudo dnf config-manager --enable mysql57-community
Besides using yum-config-manager or the dnf config-manager command, you can also select a series by editing manually the
/etc/yum.repos.d/mysql-community.repofile. This is a typical entry for a release series' subrepository in the file:[mysql80-community]name=MySQL 8.0 Community Serverbaseurl=http://repo.mysql.com/yum/mysql-8.0-community/el/6/$basearch/enabled=1gpgcheck=1gpgkey=file:///etc/pki/rpm-gpg/RPM-GPG-KEY-mysql
Find the entry for the subrepository you want to configure, and edit the
enabledoption. Specifyenabled=0to disable a subrepository, orenabled=1to enable a subrepository. For example, to install MySQL 5.7, make sure you haveenabled=0for the above subrepository entry for MySQL 8.0, and haveenabled=1for the entry for the 5.7 series:# Enable to use MySQL 5.7[mysql57-community]name=MySQL 5.7 Community Serverbaseurl=http://repo.mysql.com/yum/mysql-5.7-community/el/6/$basearch/enabled=1gpgcheck=1gpgkey=file:///etc/pki/rpm-gpg/RPM-GPG-KEY-mysql
You should only enable subrepository for one release series at any time. When subrepositories for more than one release series are enabled, the latest series will be used by Yum.
Verify that the correct subrepositories have been enabled and disabled by running the following command and checking its output (for dnf-enabled systems, replace yum in the command with dnf):
shell> yum repolist enabled | grep mysql
-
Disabling the Default MySQL Module
(EL8 systems only) EL8-based systems such as RHEL8 and Oracle Linux 8 include a MySQL module that is enabled by default. Unless this module is disabled, it masks packages provided by MySQL repositories. To disable the included module and make the MySQL repository packages visible, use the following command (for dnf-enabled systems, replace yum in the command with dnf):
shell> sudo yum module disable mysql
-
Installing MySQL
Install MySQL by the following command (for dnf-enabled systems, replace yum in the command with dnf):
shell> sudo yum install mysql-community-server
This installs the package for the MySQL server, as well as other required packages.
-
Starting the MySQL Server
Start the MySQL server with the following command:
shell> sudo service mysqld start
For EL7 and EL8-based platforms, this is the preferred command:
shell> sudo systemctl start mysqld.service
You can check the status of the MySQL server with the following command:
shell> sudo service mysqld status
For EL7 and EL8-based platforms, this is the preferred command:
shell> sudo systemctl status mysqld.service
MySQL Server Initialization (as of MySQL 5.7): At the initial start up of the server, the following happens, given that the data directory of the server is empty:
-
The server is initialized.
-
An SSL certificate and key files are generated in the data directory.
-
The validate_password plugin is installed and enabled.
-
A superuser account
'root'@'localhost'is created. A password for the superuser is set and stored in the error log file. To reveal it, use the following command:shell> sudo grep 'temporary password' /var/log/mysqld.log
Change the root password as soon as possible by logging in with the generated, temporary password and set a custom password for the superuser account:
shell> mysql -uroot -p
mysql> ALTER USER 'root'@'localhost' IDENTIFIED BY 'MyNewPass4!';
NoteMySQL's validate_password plugin is installed by default. This will require that passwords contain at least one uppercase letter, one lowercase letter, one digit, and one special character, and that the total password length is at least 8 characters.
-
-
Securing the MySQL Installation (for MySQL 5.6 only)
The program mysql_secure_installation allows you to perform important operations like setting the root password, removing anonymous users, and so on. Always run it to secure your MySQL 5.6 installation:
shell> mysql_secure_installation
It is important to remember the root password you set. See mysql_secure_installation — Improve MySQL Installation Security for details.
Do not run mysql_secure_installation after an installation of MySQL 5.7 or higher, as the function of the program has already been performed by the Yum repository installation.
For EL7-based platforms: See Compatibility Information for EL7-based platforms.
Installing Additional MySQL Products and Components
You can use Yum to install and manage individual components of MySQL. Some of these components are hosted in subrepositories of the MySQL Yum repository. Use the following command to list the packages for all the MySQL components available for your platform from all subrepositories in the MySQL Yum repository (for dnf-enabled systems, replace yum in the command with dnf):
shell> yum --disablerepo=\* --enablerepo='mysql*-community*' list available
Install any packages of your choice with the following command, replacing
package-name with name of the package (for dnf-enabled systems, replace
yumin the command with
dnf):
shell> sudo yum install package-name
For example, to install MySQL Workbench on Fedora:
shell> sudo dnf install mysql-workbench-community
Upgrading MySQL with the MySQL Yum Repository
-
Before performing any update to MySQL, follow carefully the instructions in Upgrading MySQL. Among other instructions discussed there, it is especially important to back up your database before the update.
Use the MySQL Yum repository to perform an in-place update (that is, replacing the old version and then running the new version using the old data files) for your MySQL installation by following these steps (they assume you have installed MySQL with the MySQL Yum repository or with an RPM package directly downloaded from MySQL Developer Zone's MySQL Download page; if that is not the case, following the instructions in Replacing a Native Third-Party Distribution of MySQL instead):
-
Selecting a Target Series
By default, the MySQL Yum repository updates MySQL to the latest version in the release series you have chosen during installation (see Selecting a Release Series for details), which means, for example, a 5.7.x installation will not be updated to a 8.0.x release automatically. To update to another release series, you need to first disable the subrepository for the series that has been selected (by default, or by yourself) and enable the subrepository for your target series. To do that, see the general instructions given in Selecting a Release Series for editing the subrepository entries in the
/etc/yum.repos.d/mysql-community.repofile. For upgrading from MySQL 5.7 to 8.0, perform the reverse of the steps illustrated in Selecting a Release Series, disabling the subrepository for the MySQL 5.7 series and enabling that for the MySQL 8.0 series.As a general rule, to upgrade from one release series to another, go to the next series rather than skipping a series. For example, if you are currently running MySQL 5.6 and wish to upgrade to 8.0, upgrade to MySQL 5.7 first before upgrading to 8.0.
Important-
For important information about upgrading from MySQL 5.6 to 5.7, see Upgrading from MySQL 5.6 to 5.7.
-
For important information about upgrading from MySQL 5.7 to 8.0, see Upgrading from MySQL 5.7 to 8.0.
-
In-place downgrading of MySQL is not supported by the MySQL Yum repository. Follow the instructions in Downgrading MySQL.
-
-
Upgrading MySQL
Upgrade MySQL and its components by the following command, for platforms that are not dnf-enabled:
shell> sudo yum update mysql-server
For dnf-enabled systems:
shell> sudo dnf --refresh upgrade mysql-server
Alternatively, you can update MySQL by telling Yum to update everything on your system, which might take considerably more time. For platforms that are not dnf-enabled:
shell> sudo yum update
For dnf-enabled systems:
shell> sudo dnf upgrade
-
Restarting MySQL
The MySQL server always restarts after an update by Yum. Prior to MySQL 8.0.16, run mysql_upgrade after the server restarts to check and possibly resolve any incompatibilities between the old data and the upgraded software. mysql_upgrade also performs other functions; see mysql_upgrade— Check and Upgrade MySQL Tables for details. As of MySQL 8.0.16, this step is not required, as the server performs all tasks previously handled by mysql_upgrade.
You can also update only a specific component. Use the following command to list all the installed packages for the MySQL components (for dnf-enabled systems, replace yum in the command with dnf):
shell> sudo yum list installed | grep "^mysql"
After identifying the package name of the component of your choice, update the package with the following command, replacing
package-name with the name of the package. For platforms that are not dnf-enabled:
shell> sudo yum update package-name
For dnf-enabled systems:
shell> sudo dnf upgrade package-name
Replacing a Native Third-Party Distribution of MySQL
To replace third-party distributions of MySQL that were installed from the supported Linux platforms' native software repositories with the latest GA release (from the MySQL 8.0 series currently) from the MySQL Yum repository, follow these steps:
-
Backing Up Your Database
To avoid loss of data, always back up your database before trying to replace your MySQL installation using the MySQL Yum repository. See Backup and Recovery on how to back up your database.
-
Adding the MySQL Yum Repository
Add the MySQL Yum repository to your system's repository list by following the instructions given in Adding the MySQL Yum Repository.
-
Replacing the Native Third-Party Distribution by a Yum Update or a DNF Upgrade
By design, the MySQL Yum repository will replace your native, third-party MySQL with the latest GA release (from the MySQL 8.0 series currently) from the MySQL Yum repository when you perform a yum update command (or dnf upgrade for dnf-enabled systems) on the system, or a yum update mysql-server (or dnf upgrade mysql-server for dnf-enabled systems).
After updating MySQL using the Yum repository, applications compiled with older versions of the shared client libraries should continue to work. However, if you want to recompile applications and dynamically link them with the updated libraries, see Upgrading the Shared Client Libraries for some special considerations.
-
For EL7-based platforms: See Compatibility Information for EL7-based platforms.
-
If you have a third-party distribution of MySQL that you have downloaded and installed from a nonnative repository (for example, from MariaDB or Percona), it is important to follow the instructions for replacing them given in the MySQL server's reference manual.
Installing MySQL NDB Cluster Using the Yum Repository
-
The following instructions assume that neither the MySQL server nor MySQL NDB Cluster has already been installed on your system; if that is not the case, remove the MySQL server or MySQL NDB Cluster, including all its executables, libraries, configuration files, and data directories, before you continue. However there is no need to remove the release package you might have used to enable the MySQL Yum repository on your system.
-
The NDB Cluster SQL node package has a dependency on the Perl
Class::MethodMakermodule. Yum can take care of this dependency if the EPEL (Extra Packages for Enterprise Linux) repository has been enabled on your system; see the instructions here for how to enable the EPEL repository. -
The MySQL Yum repository supports installation of MySQL NDB Cluster for release 7.5.6 and later, and for the EL6, EL7, and EL8 platforms. For other methods of installing NDB Cluster, see Installation of NDB Cluster on Linux, or Installation of NDB Cluster on Linux, depending on the release series that you are using.
-
Adding the MySQL Yum Repository for MySQL NDB Cluster
Follow the steps in Adding the MySQL Yum Repository to add the MySQL Yum repository to your system's repository list. If you have already performed the step before, make sure you have the most up-to-date version of the release package by running the following command, for platforms that are not dnf-enabled:
shell> sudo yum update mysql57-community-release
For dnf-enabled systems:
shell> sudo dnf --refresh upgrade mysql57-community-release
-
Selecting the MySQL NDB Cluster Subrepository
Within the MySQL Yum repository ( https://repo.mysql.com/yum/), the MySQL Community Server and MySQL NDB Cluster are hosted in different subrepositories. By default, the subrepository for the latest GA series of the MySQL server is enabled and the subrepository for MySQL NDB Cluster is disabled. To install NDB Cluster, disable the subrepository for the MySQL server and enable the subrepository for NDB Cluster. If your platform supports the yum-config-manager or dnf config-manager command, you can do that by issuing, for example, the following commands, which disable the subrepository for the MySQL 5.7 series and enable the one for the MySQL NDB Cluster 7.5; for platforms that are not dnf-enabled:
shell> sudo yum-config-manager --disable mysql57-communityshell> sudo yum-config-manager --enable mysql-cluster-7.5-community
For dnf-enabled platforms:
shell> sudo dnf config-manager --disable mysql57-communityshell> sudo dnf config-manager --enable mysql-cluster-7.5-community
Besides using yum-config-manager or the dnf config-manager command, you can also select a subrepository by editing manually the
/etc/yum.repos.d/mysql-community.repofile. This is a sample entry for the MySQL 5.7 subrepository in the file:[mysql57-community]name=MySQL 5.7 Community Serverbaseurl=http://repo.mysql.com/yum/mysql-5.7-community/el/6/$basearch/enabled=1gpgcheck=1gpgkey=file:///etc/pki/rpm-gpg/RPM-GPG-KEY-mysql
To install NDB Cluster 7.5, you must disable the MySQL 5.7 subrepository by making
enabled=0for the above subrepository entry and enable the NDB Cluster 7.5 subrepository by makingenabled=1for its entry:[mysql-cluster-7.5-community]name=MySQL Cluster 7.5 Communitybaseurl=http://repo.mysql.com/yum/mysql-cluster-7.5-community/el/6/$basearch/enabled=1gpgcheck=1gpgkey=file:///etc/pki/rpm-gpg/RPM-GPG-KEY-mysql
After saving the changes to the file, verify that the correct subrepositories have been enabled by running the following command (for dnf-enabled systems, replace yum in the command with dnf):
shell> yum repolist enabled | grep mysql
!mysql-cluster-7.5-community/x86_64 MySQL Cluster 7.5 Community               18
!mysql-connectors-community/x86_64  MySQL Connectors Community                31
!mysql-tools-community/x86_64       MySQL Tools Community                     33
The subrepository for NDB Cluster 7.5 (Community edition) has now been enabled. Also in the list are a number of other subrepositories of the MySQL Yum repository that have been enabled by default.
-
Installing MySQL NDB Cluster
For a minimal installation of MySQL NDB Cluster, follow these steps (for dnf-enabled systems, replace yum in the commands with dnf):
-
Install the components for SQL nodes:
shell> sudo yum install mysql-cluster-community-server
After the installation is completed, start and initialize the SQL node by following the steps given in Starting the MySQL Server.
If you choose to initialize the data directory manually using the
mysqld --initializecommand (see Initializing the Data Directory for details), arootpassword is going to be generated and stored in the SQL node's error log; see MySQL Server Initialization for how to find the password, and for a few things you need to know about it.
-
Install the executables for management nodes:
shell> sudo yum install mysql-cluster-community-management-server
-
Install the executables for data nodes:
shell> sudo yum install mysql-cluster-community-data-node
-
-
Configuring and Starting MySQL NDB Cluster
See Initial Configuration of NDB Cluster on how to configure MySQL NDB Cluster and Initial Startup of NDB Cluster on how to start it for the first time.
For EL7-based platforms: See Compatibility Information for EL7-based platforms.
Installing Additional MySQL NDB Cluster Products and Components
You can use Yum to install individual components and additional products of MySQL NDB Cluster from the MySQL Yum repository. To do that, assuming you already have the MySQL Yum repository on your system's repository list (if not, follow Step 1 and 2 of Installing MySQL NDB Cluster Using the Yum Repository), follow the same steps given in Installing Additional MySQL Products and Components.
Known issue: Currently, not all components required for running the MySQL NDB Cluster test suite are installed automatically when you install the test suite package (
mysql-cluster-community-test). Install the following packages with
yum install (or
dnf install for dnf-enabled systems) before you run the test suite:
-
mysql-cluster-community-auto-installer -
mysql-cluster-community-management-server -
mysql-cluster-community-data-node -
mysql-cluster-community-memcached -
mysql-cluster-community-java -
mysql-cluster-community-ndbclient-devel
Platform Specific Notes
ARM Support
ARM 64-bit (aarch64) is supported on Oracle Linux 7 and requires the Oracle Linux 7 Software Collections Repository (ol7_software_collections). For example, to install the server:
shell> yum-config-manager --enable ol7_software_collectionsshell> yum install mysql-community-server
ARM 64-bit (aarch64) is supported on Oracle Linux 7 as of MySQL 8.0.12.
The 8.0.12 release requires you to adjust the
libstdc++7 path by executing
ln -s /opt/oracle/oracle-armtoolset-1/root/usr/lib64 /usr/lib64/gcc7after executing the
yum install step.
Further Readings
More information on the MySQL Yum repository can be found at the following sections in the MySQL server's reference manual:
Copyright © 1997, 2020, Oracle and/or its affiliates. All rights reserved.
This software and related documentation are provided under a license agreement containing restrictions on use and disclosure and are protected by intellectual property laws. Except as expressly permitted in your license agreement or allowed by law, you may not use, copy, reproduce, translate, broadcast, modify, license, transmit, distribute, exhibit, perform, publish, or display any part, in any form, or by any means. Reverse engineering, disassembly, or decompilation of this software, unless required by law for interoperability, is prohibited.
The information contained herein is subject to change without notice and is not warranted to be error-free. If you find any errors, please report them to us in writing.
If this is software or related documentation that is delivered to the U.S. Government or anyone licensing it on behalf of the U.S. Government, then the following notice is applicable:
U.S. GOVERNMENT END USERS: Oracle programs, including any operating system, integrated software, any programs installed on the hardware, and/or documentation, delivered to U.S. Government end users are "commercial computer software" pursuant to the applicable Federal Acquisition Regulation and agency-specific supplemental regulations. As such, use, duplication, disclosure, modification, and adaptation of the programs, including any operating system, integrated software, any programs installed on the hardware, and/or documentation, shall be subject to license terms and license restrictions applicable to the programs. No other rights are granted to the U.S. Government.
This software or hardware is developed for general use in a variety of information management applications. It is not developed or intended for use in any inherently dangerous applications, including applications that may create a risk of personal injury. If you use this software or hardware in dangerous applications, then you shall be responsible to take all appropriate fail-safe, backup, redundancy, and other measures to ensure its safe use. Oracle Corporation and its affiliates disclaim any liability for any damages caused by use of this software or hardware in dangerous applications.
Oracle and Java are registered trademarks of Oracle and/or its affiliates. Other names may be trademarks of their respective owners.
Intel and Intel Xeon are trademarks or registered trademarks of Intel Corporation. All SPARC trademarks are used under license and are trademarks or registered trademarks of SPARC International, Inc. AMD, Opteron, the AMD logo, and the AMD Opteron logo are trademarks or registered trademarks of Advanced Micro Devices. UNIX is a registered trademark of The Open Group.
This software or hardware and documentation may provide access to or information about content, products, and services from third parties. Oracle Corporation and its affiliates are not responsible for and expressly disclaim all warranties of any kind with respect to third-party content, products, and services unless otherwise set forth in an applicable agreement between you and Oracle. Oracle Corporation and its affiliates will not be responsible for any loss, costs, or damages incurred due to your access to or use of third-party content, products, or services, except as set forth in an applicable agreement between you and Oracle.
This documentation is NOT distributed under a GPL license. Use of this documentation is subject to the following terms:
You may create a printed copy of this documentation solely for your own personal use. Conversion to other formats is allowed as long as the actual content is not altered or edited in any way. You shall not publish or distribute this documentation in any form or on any media, except if you distribute the documentation in a manner similar to how Oracle disseminates it (that is, electronically for download on a Web site with the software) or on a CD-ROM or similar medium, provided however that the documentation is disseminated together with the software on the same medium. Any other use, such as any dissemination of printed copies or use of this documentation, in whole or in part, in another publication, requires the prior written consent from an authorized representative of Oracle. Oracle and/or its affiliates reserve any and all rights to this documentation not expressly granted above.
For information about Oracle's commitment to accessibility, visit the Oracle Accessibility Program website at https://www.oracle.com/corporate/accessibility/.
Oracle customers that have purchased support have access to electronic support through My Oracle Support. For information, visit https://www.oracle.com/corporate/accessibility/learning-support.html#support-tab.
CentOS7yum安装mysql+需要:libsasl2.so.2()(64bit)
1.rpm -Uvh http://dev.mysql.com/get/mysql-community-release-el6-5.noarch.rpm #下载
2.yum install yum-utils -y #装源
3.yum-config-manager --disable mysql56-community # 禁用MySQL5.6的源
4.yum-config-manager --enable mysql57-community-dmr # 启用MySQL5.7的源
5.yum repolist enabled | grep mysql
6.yum install mysql-community-server #安装mysql
到这里时有些会报一下错
错误显示:
软件包:mysql-community-server-5.7.20-1.el6.x86_64 (mysql57-community)
需要:libsasl2.so.2()(64bit)
您可以尝试添加 --skip-broken 选项来解决该问题
您可以尝试执行:rpm -Va --nofiles --nodigest
解决方法:
修改vim /etc/yum.repos.d/mysql-community.repo 源文件
[mysql57-community]
name=MySQL 5.7 Community Server
## baseurl=http://repo.mysql.com/yum/mysql-5.7-community/el/6/$basearch/
baseurl=http://repo.mysql.com/yum/mysql-5.7-community/el/7/$basearch/
enabled=1
gpgcheck=0
gpgkey=file:///etc/pki/rpm-gpg/RPM-GPG-KEY-mysql
7.yum install mysql-community-server #再次安装mysql
8.systemctl start mysqld #启动mysql
9.systemctl status mysqld #查看mysql启动状态
About Me
|
........................................................................................................................ ● 本文作者:小麦苗,部分内容整理自网络,若有侵权请联系小麦苗删除 ● 本文在itpub、博客园、CSDN和个人微 信公众号( DB宝)上有同步更新 ● 本文itpub地址: http://blog.itpub.net/26736162 ● 本文博客园地址: http://www.cnblogs.com/lhrbest ● 本文CSDN地址: https://blog.csdn.net/lihuarongaini ● 本文pdf版、个人简介及小麦苗云盘地址: http://blog.itpub.net/26736162/viewspace-1624453/ ● 数据库笔试面试题库及解答: http://blog.itpub.net/26736162/viewspace-2134706/ ● DBA宝典今日头条号地址: http://www.toutiao.com/c/user/6401772890/#mid=1564638659405826 ........................................................................................................................ ● QQ群号: 230161599 、618766405 ● 微 信群:可加我微 信,我拉大家进群,非诚勿扰 ● 联系我请加QQ好友 ( 646634621 ),注明添加缘由 ● 于 2020-04-01 06:00 ~ 2020-04-30 24:00 在西安完成 ● 最新修改时间:2020-04-01 06:00 ~ 2020-04-30 24:00 ● 文章内容来源于小麦苗的学习笔记,部分整理自网络,若有侵权或不当之处还请谅解 ● 版权所有,欢迎分享本文,转载请保留出处 ........................................................................................................................ ● 小麦苗的微店: https://weidian.com/s/793741433?wfr=c&ifr=shopdetail ● 小麦苗出版的数据库类丛书: http://blog.itpub.net/26736162/viewspace-2142121/ ● 小麦苗OCP、OCM、高可用网络班: http://blog.itpub.net/26736162/viewspace-2148098/ ● 小麦苗腾讯课堂主页: https://lhr.ke.qq.com/ ........................................................................................................................ 使用 微 信客户端扫描下面的二维码来关注小麦苗的微 信公众号( DB宝)及QQ群(DBA宝典)、添加小麦苗微 信, 学习最实用的数据库技术。
........................................................................................................................ |

 |
|