本章内容承接“Java编程思想 - 18.1 - 字节流和字符流”。JDK 1.4引入了新的Java IO类库java.nio.*旨在提高IO速度。笔者愚钝,认为NIO是Java编程思想第18章中最难理解的部分,Eckel在这部分内容的安排上也让人难以抓到重点,笔者总结主要有以下内容:
-
Java NIO概述:NIO与IO的区别
-
缓冲器Buffer
-
通道Channel
-
选择器Selector
特别申明下,本章的大部分内容来源于并发编程网的Java NIO系列教程http://ifeve.com/overview/ 。笔者在此基础上做了整理和总结,并丰富了实例。不足之处,还望赐教!
1. Java NIO概述:NIO与IO的区别
Java NIO由三个核心部分组成:
-
通道Channel
-
缓冲器Buffer
-
选择器Selector
通道类似于流(Stream),但通道是双向的(Stream是单向的,输入流只能输入,输出流负责输出)。它相当于一座数据宝库,而唯一能与Channel交互的就是缓冲器Buffer,Channel要么从Buffer读数据,要么向Buffer写数据。
选择器Selector是负责管理通道的。Java NIO的选择器允许一个单独的线程来监视多个输入通道,你可以注册多个通道使用一个选择器,然后使用一个单独的线程来“选择”通道:这些通道里已经有可以处理的输入,或者选择已准备写入的通道。这种选择机制,使得一个单独的线程很容易来管理多个通道。
问题来了,通过Channel、Buffer、Selector,NIO是如何来提速的呢?
1. NIO是面向缓冲的
Java IO是面向流的,这意味着每次从流中读入的字节是固定的,如果你想要字节多少能够滑动,你必须先设定一个缓存(BufferInputStream),再从缓存中读数据。
Java NiO是面向缓冲的,数据读取和写入直接通过一个缓冲区来处理。这就增加了处理过程的灵活性。
2. NIO是非阻塞的
Java IO的流是阻塞的,比如调用InputStream.read()方法时是阻塞的,它会一直等到数据到来时(或超时)才会返回。
Java NIO的非阻塞模式,使一个线程从某通道发送请求读取数据,但是它仅能得到目前可用的数据,如果目前没有数据可用时,就什么都不会获取。非阻塞写也是如此。一个线程请求写入一些数据到某通道,但不需要等待它完全写入,这个线程同时可以去做别的事情。
3. NIO通过Selector管理多通道
Java NIO的非阻塞模式,需要一个Selector线程来灵活的调度各个通道。线程通常将非阻塞IO的空闲时间用于在其它通道上执行IO操作,所以一个单独的线程现在可以管理多个输入和输出Channel。
2. 缓冲器Buffer
Java NIO 有以下Buffer类型,分别对应不同的Java基础类型:byte, short, int, long, float, double 和 char。而MappedByteBuffer用于表示内存映射文件,我们将单独用一小节介绍。
-
ByteBuffer
-
MappedByteBuffer
-
CharBuffer
-
DoubleBuffer
-
FloatBuffer
-
IntBuffer
-
LongBuffer
-
ShortBuffer
Buffer处理数据的一般步骤
Buffer源码如下所示:
package java.nio; public abstract class Buffer { private int mark = -1; private int position = 0; private int limit; private int capacity; long address;
Buffer(int mark, int pos, int lim, int cap) { if (cap < 0) throw new IllegalArgumentException("Negative capacity: " + cap); this.capacity = cap;
limit(lim);
position(pos); if (mark >= 0) { if (mark > pos) throw new IllegalArgumentException("mark > position: (" + mark + " > " + pos + ")"); this.mark = mark;
}
} public final int capacity() { return capacity;
} public final int position() { return position;
} public final Buffer position(int newPosition) { if ((newPosition > limit) || (newPosition < 0)) throw new IllegalArgumentException();
position = newPosition; if (mark > position) mark = -1; return this;
} public final int limit() { return limit;
} public final Buffer limit(int newLimit) { if ((newLimit > capacity) || (newLimit < 0)) throw new IllegalArgumentException();
limit = newLimit; if (position > limit) position = limit; if (mark > limit) mark = -1; return this;
} public final Buffer mark() {
mark = position; return this;
} public final Buffer reset() { int m = mark; if (m < 0) throw new InvalidMarkException();
position = m; return this;
} public final Buffer clear() {
position = 0;
limit = capacity;
mark = -1; return this;
} public final Buffer flip() {
limit = position;
position = 0;
mark = -1; return this;
} public final Buffer rewind() {
position = 0;
mark = -1; return this;
} public final int remaining() { return limit - position;
} public final boolean hasRemaining() { return position < limit;
}
...
}
-
1
-
2
-
3
-
4
-
5
-
6
-
7
-
8
-
9
-
10
-
11
-
12
-
13
-
14
-
15
-
16
-
17
-
18
-
19
-
20
-
21
-
22
-
23
-
24
-
25
-
26
-
27
-
28
-
29
-
30
-
31
-
32
-
33
-
34
-
35
-
36
-
37
-
38
-
39
-
40
-
41
-
42
-
43
-
44
-
45
-
46
-
47
-
48
-
49
-
50
-
51
-
52
-
53
-
54
-
55
-
56
-
57
-
58
-
59
-
60
-
61
-
62
-
63
-
64
-
65
-
66
-
67
-
68
-
69
-
70
-
71
-
72
-
73
-
74
-
75
-
76
-
77
-
78
-
79
-
80
-
81
-
82
-
83
-
84
-
85
-
86
-
87
-
88
-
89
-
90
-
91
-
92
-
93
-
94
-
95
-
96
笔者认为使用Buffer读写数据一般遵循以下几个步骤:
1. allocate():分配容量
2. read(buffer):读数据
3. flip():读写切换
4. write(buffer):写数据
5. clear():清空缓冲区,让它可以再次被写入
举个例子:
package c18; import java.io.FileInputStream; import java.io.FileOutputStream; import java.io.IOException; import java.nio.ByteBuffer; import java.nio.channels.FileChannel; public class ByteBufferDemo { private static final int BSIZE = 1024; public static void main(String[] args) throws IOException { if (args.length != 2) {
System.out.println("arguments:sourcefile destfile");
System.exit(1);
}
FileChannel in = new FileInputStream(args[0]).getChannel(),
out = new FileOutputStream(args[1]).getChannel(); ByteBuffer buffer = ByteBuffer.allocate(BSIZE); while (in.read(buffer)!= -1) { buffer.flip();
out.write(buffer);
buffer.clear();
}
}
}
-
1
-
2
-
3
-
4
-
5
-
6
-
7
-
8
-
9
-
10
-
11
-
12
-
13
-
14
-
15
-
16
-
17
-
18
-
19
-
20
-
21
-
22
-
23
-
24
-
25
-
26
-
27
-
28
-
29
缓冲区细节
Buffer可以高效地访问及操纵数据主要通过四个索引:mark、position、limit和capacity。而缓冲区是如何来处理数据的读写的,这个过程我在网上看过几篇文章,个人认为并发编程网上讲的是比较清晰的(http://ifeve.com/buffers/):
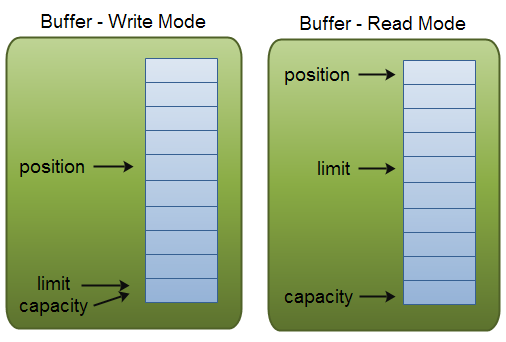
Buffer写模式:将数据写到Buffer中,position表示当前的位置。初始的position值为0.当一个byte、long等数据写到Buffer后,position会向前移动到下一个可插入数据的Buffer单元。limit表示你最多能往Buffer里写多少数据。 写模式下,limit=capacity。
Buffer读模式:读取Buffer中的数据,position会被重置为0,limit会被设置成写模式下的position值。 limit表示你最多能读到多少数据。(这个过程通过flip()函数来完成)
mark是辅助用的游标,用于标记position的特殊位置。capacity表示Buffer的固定大小。
Buffer大小的分配
Buffer大小的分配可以通过allocate方法或者allocateDirect方法来实现,二者有什么区别呢?我们以ByteBuffer来说:
-
allocate(int capacity):从堆空间中分配一个容量大小为capacity的byte数组作为缓冲区的byte数据存储器
public static ByteBuffer allocate(int capacity) { if (capacity < 0) throw new IllegalArgumentException(); return new HeapByteBuffer(capacity, capacity);
}
-
allocateDirect(int capacity):不通过JVM,而是直接通过操作系统来创建内存块用作缓冲区,它与当前操作系统能够更好的耦合,因此能进一步提高I/O操作速度。但是分配直接缓冲区的系统开销很大,因此只有在缓冲区较大并长期存在,或者需要经常重用时,才使用这种缓冲区。
public static ByteBuffer allocateDirect(int capacity) { return new DirectByteBuffer(capacity);
}
向Buffer中写数据和读数据
有两种方式向Buffer中写数据和读数据:
1. 通过Channel存储到Buffer,从Buffer中读取数据到Channel
2. 通过Buffer的put()方法写到Buffer里,使用get()方法从Buffer中读取数据。
public abstract class ByteBuffer extends Buffer implements Comparable { public abstract byte get( ); public abstract byte get (int index); public abstract ByteBuffer put (byte b); public abstract ByteBuffer put (int index, byte b);
}
内存映射文件
本章的内容安排是根据Buffer处理数据的一般步骤展开的。而这一节则是单独的,用于介绍内存映射文件MappedByteBuffer。
内存映射文件允许我们创建和修改那些因为太大而不能放入内存的文件。有了内存映射文件,我们就可以假定整个文件都放在内存中,而且可以完全把它当做非常大的数组来访问。
举个例子:
package c18;
import java.io.RandomAccessFile;
import java.nio.MappedByteBuffer;
import java.nio.channels.FileChannel; public class MappedByteBufferDemo { static int length = 0x8FFFFFF; public static void main(String[] args) throws Exception{ @SuppressWarnings("resource")
MappedByteBuffer out = new RandomAccessFile("test.dat", "rw").getChannel()
.map(FileChannel.MapMode.READ_WRITE, 0, length); for (int i = 0; i < length; i++) { out.put((byte) 'x');
}
System.out.println("Finished writing"); for (int j = length/2; j < length/2 + 6; j++) {
System.out.println((char)out.get(j));
}
}
}
输出结果:
Finished writing
x
x
x
x
x
x
-
1
-
2
-
3
-
4
-
5
-
6
-
7
-
8
-
9
-
10
-
11
-
12
-
13
-
14
-
15
-
16
-
17
-
18
-
19
-
20
-
21
-
22
-
23
-
24
-
25
-
26
-
27
-
28
-
29
-
30
-
31
-
32
-
33
-
34
-
35
-
36
-
37
内存映射文件访问可以更加显著地提高性能,下面的程序进行了简单的性能比较。
package c18; import java.io.BufferedInputStream; import java.io.BufferedOutputStream; import java.io.DataInputStream; import java.io.DataOutputStream; import java.io.File; import java.io.FileInputStream; import java.io.FileOutputStream; import java.io.IOException; import java.io.RandomAccessFile; import java.nio.IntBuffer; import java.nio.channels.FileChannel; public class TestNIO { private static int numOfInts = 4000000; private static int numOfbuffInts = 200000; /**
* 模板模式Template
* 为后面的匿名内部子类定义的test()的各种实现创建了测试框架,每个子类都执行一种测试
*/ private abstract static class Tester { private String name; public Tester(String name) { this.name = name;
} public void runTest() {
System.out.println(name + ":"); try { long start = System.nanoTime();
test(); double duration = System.nanoTime() - start;
System.out.format("%.2f\n",duration/1.0e9);
} catch (IOException e) { throw new RuntimeException(e);
}
} public abstract void test() throws IOException;
} private static Tester[] tests = { new Tester("Stream Write") { public void test() throws IOException {
DataOutputStream dos = new DataOutputStream( new BufferedOutputStream( new FileOutputStream(new File("temp.tmp")))); for(int i = 0; i < numOfInts; i++)
dos.writeInt(i);
dos.close();
}
}, new Tester("Mapped Write") { public void test() throws IOException { @SuppressWarnings("resource")
FileChannel fc = new RandomAccessFile("temp.tmp", "rw").getChannel();
IntBuffer ib = fc.map(
FileChannel.MapMode.READ_WRITE,0,fc.size())
.asIntBuffer(); for(int i = 0; i < numOfInts; i++)
ib.put(i);
fc.close();
}
}, new Tester("Stream Read") { public void test() throws IOException {
DataInputStream dis = new DataInputStream( new BufferedInputStream(new FileInputStream("temp.tmp"))); for(int i = 0; i < numOfInts; i++)
dis.readInt();
dis.close();
}
}, new Tester("Map Read") { public void test() throws IOException { @SuppressWarnings("resource")
FileChannel fc = new FileInputStream( new File("temp.tmp")).getChannel();
IntBuffer ib = fc.map(
FileChannel.MapMode.READ_ONLY,0,fc.size())
.asIntBuffer(); while(ib.hasRemaining())
ib.get();
fc.close();
}
}, new Tester("Stream Read/Write") { public void test() throws IOException {
RandomAccessFile raf = new RandomAccessFile( new File("temp.tmp"),"rw");
raf.writeInt(1); for(int i = 0; i < numOfbuffInts; i++) {
raf.seek(raf.length() - 4);
raf.writeInt(raf.readInt());
}
raf.close();
}
}, new Tester("Map Read/Write") { public void test() throws IOException { @SuppressWarnings("resource")
FileChannel fc = new RandomAccessFile("temp.tmp", "rw").getChannel();
IntBuffer ib = fc.map(
FileChannel.MapMode.READ_WRITE,0,fc.size())
.asIntBuffer(); for(int i = 1; i < numOfbuffInts; i++)
ib.put(ib.get(i - 1));
fc.close();
}
},
}; public static void main(String[] args) { for (Tester tester: tests) {
tester.runTest();
}
}
}
输出结果:
Stream Write: 0.36 Mapped Write: 0.02 Stream Read: 0.34 Map Read: 0.01 Stream Read/Write: 7.59 Map Read/Write: 0.01
-
1
-
2
-
3
-
4
-
5
-
6
-
7
-
8
-
9
-
10
-
11
-
12
-
13
-
14
-
15
-
16
-
17
-
18
-
19
-
20
-
21
-
22
-
23
-
24
-
25
-
26
-
27
-
28
-
29
-
30
-
31
-
32
-
33
-
34
-
35
-
36
-
37
-
38
-
39
-
40
-
41
-
42
-
43
-
44
-
45
-
46
-
47
-
48
-
49
-
50
-
51
-
52
-
53
-
54
-
55
-
56
-
57
-
58
-
59
-
60
-
61
-
62
-
63
-
64
-
65
-
66
-
67
-
68
-
69
-
70
-
71
-
72
-
73
-
74
-
75
-
76
-
77
-
78
-
79
-
80
-
81
-
82
-
83
-
84
-
85
-
86
-
87
-
88
-
89
-
90
-
91
-
92
-
93
-
94
-
95
-
96
-
97
-
98
-
99
-
100
-
101
-
102
-
103
-
104
-
105
-
106
-
107
-
108
-
109
-
110
-
111
-
112
-
113
-
114
-
115
-
116
-
117
-
118
-
119
-
120
-
121
-
122
-
123
-
124
-
125
-
126
-
127
-
128
-
129
-
130
-
131
-
132
-
133
-
134
-
135
-
136
-
137
-
138
-
139
-
140
-
141
-
142
-
143
-
144
-
145
-
146
-
147
-
148
-
149
-
150
-
151
到这里Buffer基本上已经讲完了,最后补充一个问题,clear()与compact()方法的区别是什么?
clear():如果调用的是clear()方法,position将被设回0,limit被设置成 capacity的值。换句话说,Buffer 被清空了。Buffer中的数据并未清除,只是这些标记告诉我们可以从哪里开始往Buffer里写数据。
compact(): 如果Buffer中仍有未读的数据,且后续还需要这些数据,但是此时想要先先写些数据,那么使用compact()方法。compact()方法将所有未读的数据拷贝到Buffer起始处。然后将position设到最后一个未读元素正后面。limit属性依然像clear()方法一样,设置成capacity。现在Buffer准备好写数据了,但是不会覆盖未读的数据。
3. 通道Channel
NIO中关键的通道Channel实现包括:
-
FileChannel:从文件中读写数据
-
DatagramChannel:通过UDP读写网络中的数据
-
SocketChannel:通过TCP读写网络中的数据
-
ServerSocketChannel:监听新进来的TCP连接,像Web服务器那样。对每一个新进来的连接都会创建一个SocketChannel
FileChannel
FileChannel是一个连接到文件的通道。无法设置为非阻塞模式,总是运行在阻塞模式下。
我们无法通过FileChannel直接打开一个文件,需要通过InputStream、OutputStream或RandomAccessFile来获取一个FileChannel实例。
下面给出FileChannel的一个例子:
package c18; import java.io.IOException; import java.io.RandomAccessFile; import java.nio.ByteBuffer; import java.nio.channels.FileChannel; public class FileChannelDemo { private static final int BSIZE = 1024; public static void main(String[] args) throws IOException {
String newData = "FileChannelDemo!"; @SuppressWarnings("resource")
FileChannel fc = new RandomAccessFile("newData.txt", "rw").getChannel();
ByteBuffer buffer = ByteBuffer.allocate(BSIZE);
buffer.put(newData.getBytes());
buffer.flip(); while (buffer.hasRemaining()) {
fc.write(buffer);
}
fc.close();
}
}
打开文件newData.txt
内容为FileChannelDemo!
-
1
-
2
-
3
-
4
-
5
-
6
-
7
-
8
-
9
-
10
-
11
-
12
-
13
-
14
-
15
-
16
-
17
-
18
-
19
-
20
-
21
-
22
-
23
-
24
-
25
-
26
-
27
-
28
-
29
-
30
-
31
DatagramChannel
DatagramChannel是一个能收发UDP包的通道。它有两种使用方式。
receive/send
通过receive方法接受数据,send方法发送数据。举个例子:
package c18; import java.io.IOException; import java.net.InetSocketAddress; import java.nio.ByteBuffer; import java.nio.channels.DatagramChannel; public class DatagramChannelDemo1 { public static void main(String[] args) { try {
DatagramChannel channel = DatagramChannel.open(); channel.socket().bind(new InetSocketAddress(8080));
String newData = "DatagramChannelDemo1!";
ByteBuffer buffer = ByteBuffer.allocate(48);
buffer.clear();
buffer.put(newData.getBytes());
buffer.flip(); int bytesSent = channel.send(buffer, new InetSocketAddress("localhost",80));
System.out.println(bytesSent);
channel.close();
} catch (IOException e) {
e.printStackTrace();
}
}
}
输出结果: 21
-
1
-
2
-
3
-
4
-
5
-
6
-
7
-
8
-
9
-
10
-
11
-
12
-
13
-
14
-
15
-
16
-
17
-
18
-
19
-
20
-
21
-
22
-
23
-
24
-
25
-
26
-
27
-
28
-
29
-
30
-
31
-
32
-
33
-
34
read/write
可以将DatagramChannel“连接”到网络中的特定地址的。由于UDP是无连接的,连接到特定地址并不会像TCP通道那样创建一个真正的连接。而是锁住DatagramChannel ,让其只能从特定地址收发数据。
当连接后,也可以使用read()和write()方法,就像在用传统的通道一样。举个例子:
package c18; import java.io.IOException; import java.net.InetSocketAddress; import java.nio.ByteBuffer; import java.nio.channels.DatagramChannel; public class DatagramChannelDemo2 { public static void main(String[] args)  { try {
            DatagramChannel channel = DatagramChannel.open();
            channel.connect(new InetSocketAddress("localhost",80));

            String newData = "DatagramChannelDemo1!";

            ByteBuffer buffer = ByteBuffer.allocate(48);
            buffer.clear();
            buffer.put(newData.getBytes());
            buffer.flip();

            channel.write(buffer);
            channel.close();
        } catch (IOException e) {
            e.printStackTrace();
        }
    }
}
-
1
-
2
-
3
-
4
-
5
-
6
-
7
-
8
-
9
-
10
-
11
-
12
-
13
-
14
-
15
-
16
-
17
-
18
-
19
-
20
-
21
-
22
-
23
-
24
-
25
-
26
-
27
SocketChannel
SocketChannel可以设置为非阻塞模式。
SocketChannel阻塞模式
没什么好讲的,和其他类的实现基本一样,主要方法包括connect()连接地址,、read()读数据、write()写数据。直接上例子:
package c18; import java.io.IOException; import java.net.InetSocketAddress; import java.nio.ByteBuffer; import java.nio.channels.SocketChannel; public class SocketChannelBlockDemo { public static void main(String[] args) throws IOException {
        SocketChannel socketChannel = SocketChannel.open();
        socketChannel.connect(new InetSocketAddress("localhost",80));

        String newData = "SocketChannelBlockDemo!";

        ByteBuffer buffer = ByteBuffer.allocate(48);
        buffer.clear();
        buffer.put(newData.getBytes());
        buffer.flip();

        socketChannel.write(buffer);
        socketChannel.close();
    }
}
-
1
-
2
-
3
-
4
-
5
-
6
-
7
-
8
-
9
-
10
-
11
-
12
-
13
-
14
-
15
-
16
-
17
-
18
-
19
-
20
-
21
-
22
-
23
-
24
SocketChannel非阻塞模式
SocketChannel通过configureBlocking方法来设置非阻塞模式(默认为true,设置为false启用非阻塞模式)。需要注意的是,如果SocketChannel在非阻塞模式下,为了保证在连接未建立前可以做其他事情,可以调用finishConnect()方法。
举个例子:
package c18; import java.io.IOException; import java.net.InetSocketAddress; import java.nio.ByteBuffer; import java.nio.channels.SocketChannel; public class SocketChannelUnBlockDemo { public static void main(String[] args) throws IOException {
SocketChannel socketChannel = SocketChannel.open();
socketChannel.configureBlocking(false);
socketChannel.connect(new InetSocketAddress("localhost",80)); while (!socketChannel.finishConnect()) { }
String newData = "SocketChannelBlockDemo!";
ByteBuffer buffer = ByteBuffer.allocate(48);
buffer.clear();
buffer.put(newData.getBytes());
buffer.flip();
socketChannel.write(buffer);
socketChannel.close();
}
}
-
1
-
2
-
3
-
4
-
5
-
6
-
7
-
8
-
9
-
10
-
11
-
12
-
13
-
14
-
15
-
16
-
17
-
18
-
19
-
20
-
21
-
22
-
23
-
24
-
25
-
26
-
27
ServerSocketChannel
通过 ServerSocketChannel可以监听新进来的TCP连接。同样包括了阻塞和非阻塞两种方式。
ServerSocketChannel阻塞方式
通过 ServerSocketChannel.accept() 方法监听新进来的连接。当 accept()方法返回的时候,它返回一个包含新进来的连接的 SocketChannel。因此, accept()方法会一直阻塞到有新连接到达。
举个例子:
package c18; import java.io.IOException; import java.net.InetSocketAddress; import java.nio.ByteBuffer; import java.nio.channels.ServerSocketChannel; import java.nio.channels.SocketChannel; public class ServerSocketChannelBlockDemo { public static void main(String[] args) throws IOException {
        ServerSocketChannel channel = ServerSocketChannel.open();
        channel.socket().bind(new InetSocketAddress("localhost",80)); /**
         * 当接受到新的tcp连接后,才能将newData内容写入tcp连接
         */ while (true) {
            SocketChannel socketChannel =
                    channel.accept();

            String newData = "SocketChannelBlockDemo!";

            ByteBuffer buffer = ByteBuffer.allocate(48);
            buffer.clear();
            buffer.put(newData.getBytes());
            buffer.flip();

            socketChannel.write(buffer);
            socketChannel.close();
            channel.close();
        }
    }
}
-
1
-
2
-
3
-
4
-
5
-
6
-
7
-
8
-
9
-
10
-
11
-
12
-
13
-
14
-
15
-
16
-
17
-
18
-
19
-
20
-
21
-
22
-
23
-
24
-
25
-
26
-
27
-
28
-
29
-
30
-
31
-
32
ServerSocketChannel非阻塞方式
ServerSocketChannel可以设置成非阻塞模式。在非阻塞模式下,accept() 方法会立刻返回,如果还没有新进来的连接,返回的将是null。 因此,需要检查返回的SocketChannel是否是null。
举个例子:
package c18; import java.io.IOException; import java.net.InetSocketAddress; import java.nio.ByteBuffer; import java.nio.channels.ServerSocketChannel; import java.nio.channels.SocketChannel; public class ServerSocketChannelUnBlockDemo { public static void main(String[] args) throws IOException {
ServerSocketChannel channel = ServerSocketChannel.open();
channel.socket().bind(new InetSocketAddress("localhost",80)); channel.configureBlocking(false); /**
* 当接受到新的tcp连接后,才能将newData内容写入tcp连接
*/ while (true) {
SocketChannel socketChannel =
channel.accept(); if(socketChannel != null){
String newData = "SocketChannelBlockDemo!";
ByteBuffer buffer = ByteBuffer.allocate(48);
buffer.clear();
buffer.put(newData.getBytes());
buffer.flip();
socketChannel.write(buffer);
socketChannel.close();
channel.close();
}
}
}
}
-
1
-
2
-
3
-
4
-
5
-
6
-
7
-
8
-
9
-
10
-
11
-
12
-
13
-
14
-
15
-
16
-
17
-
18
-
19
-
20
-
21
-
22
-
23
-
24
-
25
-
26
-
27
-
28
-
29
-
30
-
31
-
32
-
33
-
34
-
35
-
36
非阻塞方式需要与Selector配合使用才能起到更好的效果,下一节我们将介绍调度器Selector。
通道间数据传输
对于FileChannel而言,可以通过transferFrom()和transferTo()将一个通道与另一个通道相连:
public abstract long transferFrom(ReadableByteChannel src,long position, long count) throws IOException; public abstract long transferTo(long position, long count,
                                    WritableByteChannel target) throws IOException;
举个例子:
package c18;
import java.io.FileInputStream;
import java.io.FileOutputStream;
import java.io.IOException;
import java.nio.channels.FileChannel;
public class TransferDemo { @SuppressWarnings("resource") public static void main(String[] args) throws IOException { if (args.length != 2) {
System.out.println("arguments:sourcefile destfile");
System.exit(1);
}
FileChannel in = new FileInputStream(args[0]).getChannel(),
out = new FileOutputStream(args[1]).getChannel();
in.transferTo(0, in.size(), out); }
}
-
1
-
2
-
3
-
4
-
5
-
6
-
7
-
8
-
9
-
10
-
11
-
12
-
13
4. 调度器Selector
Selector(选择器)是Java NIO中能够检测一到多个NIO通道,并能够知晓通道是否为诸如读写事件做好准备的组件。这样,一个单独的线程可以管理多个Channel,从而管理多个网络连接。Channel结合Selector才能更好实现非阻塞的传输方式。
为什么使用Selector?
仅用单个线程来处理多个Channels的好处是,只需要更少的线程来处理通道。事实上,可以只用一个线程处理所有的通道。对于操作系统来说,线程之间上下文切换的开销很大,而且每个线程都要占用系统的一些资源(如内存)。因此,使用的线程越少越好。
但是,需要记住,现代的操作系统和CPU在多任务方面表现的越来越好,所以多线程的开销随着时间的推移,变得越来越小了。实际上,如果一个CPU有多个内核,不使用多任务可能是在浪费CPU能力。不管怎么说,关于那种设计的讨论应该放在另一篇不同的文章中。在这里,只要知道使用Selector能够处理多个通道就足够了。
Selector的创建和注册
需要注意的是Selector只能在Channel非阻塞模式下才能使用,这意味着FileChannel是不能使用Selector的,而套接字通道都是可以的(包括TCP和UDP)。
Selector selector = Selector.open(); channel.configureBlocking(false); SelectionKey key = channel.register(selector, Selectionkey.OP_READ);
其中,注册register方法的第二个参数表示”interest”集合,意思是在通过Selector监听Channel时感兴趣的事件。包括:
-
SelectionKey.OP_CONNECT:连接就绪
-
SelectionKey.OP_ACCEPT:接受就绪,一个server socket channel准备好接收新进入的连接
-
SelectionKey.OP_READ:读就绪,一个有数据可读的通道
-
SelectionKey.OP_WRITE:写就绪,等待写数据的通道
如果你对不止一种事件感兴趣,那么可以用“位或”操作符将常量连接起来,如下:
int interestSet = SelectionKey.OP_READ|SelectionKey.OP_WRITE;
SelectionKey对象的处理
在上一小节中,当向Selector注册Channel时,register()方法会返回一个SelectionKey对象。包括:
selectionKey.isAcceptable() selectionKey.isConnectable() selectionKey.isReadable() selectionKey.isWritable()
Channel channel = selectionKey.channel();
Selector selector = selectionKey.selector();
通过Selector选择通道
一旦向Selector注册了一或多个通道,就可以调用几个重载的select()方法。这些方法返回你所感兴趣的事件(如连接、接受、读或写)已经准备就绪的那些通道。
public abstract int select() throws IOException; public abstract int select(long timeout) throws IOException; public abstract int selectNow() throws IOException;
一旦调用了select()方法,并且返回值表明有一个或更多个通道就绪了,然后可以通过调用selector的selectedKeys()方法,访问“已选择键集(selected key set)”中的就绪通道。
Set selectedKeys = selector.selectedKeys();
因此,选择一个可用的通道过程如下:
Set selectedKeys = selector.selectedKeys();
Iterator keyIterator = selectedKeys.iterator(); while(keyIterator.hasNext()) {
SelectionKey key = keyIterator.next(); if(key.isAcceptable()) { } else if (key.isConnectable()) { } else if (key.isReadable()) { } else if (key.isWritable()) { }
keyIterator.remove();
}
-
1
-
2
-
3
-
4
-
5
-
6
-
7
-
8
-
9
-
10
-
11
-
12
-
13
-
14
-
15
这个循环遍历已选择键集中的每个键,并检测各个键所对应的通道的就绪事件。
注意每次迭代末尾的keyIterator.remove()调用。Selector不会自己从已选择键集中移除SelectionKey实例。必须在处理完通道时自己移除。下次该通道变成就绪时,Selector会再次将其放入已选择键集中。
到此,我们可以写一个完整的Selector实例了:
NIO服务端:
package c18; import java.net.InetSocketAddress; import java.nio.ByteBuffer; import java.nio.channels.SelectionKey; import java.nio.channels.Selector; import java.nio.channels.ServerSocketChannel; import java.nio.channels.SocketChannel; import java.util.Iterator; public class NIOServer { private Selector selector; public void initServer(int port) throws Exception { ServerSocketChannel serverChannel = ServerSocketChannel.open(); serverChannel.configureBlocking(false); serverChannel.socket().bind(new InetSocketAddress(port)); this.selector = Selector.open(); serverChannel.register(selector, SelectionKey.OP_ACCEPT);
} public void listen() throws Exception {
System.out.println("start server"); while (true) { selector.select(); Iterator ite = this.selector.selectedKeys().iterator(); while (ite.hasNext()) {
SelectionKey key = (SelectionKey) ite.next(); ite.remove(); if (key.isAcceptable()) {
ServerSocketChannel server = (ServerSocketChannel) key.channel(); SocketChannel channel = server.accept(); channel.configureBlocking(false); channel.write(ByteBuffer.wrap(new String("hello client").getBytes())); channel.register(this.selector, SelectionKey.OP_READ); } else if (key.isReadable()) {
read(key);
}
}
}
} private void read(SelectionKey key) throws Exception { SocketChannel channel = (SocketChannel) key.channel(); ByteBuffer buffer = ByteBuffer.allocate(10);
channel.read(buffer); byte[] data = buffer.array();
String msg = new String(data).trim();
System.out.println("server receive from client: " + msg);
ByteBuffer outBuffer = ByteBuffer.wrap(msg.getBytes());
channel.write(outBuffer);
} public static void main(String[] args) throws Throwable {
NIOServer server = new NIOServer();
server.initServer(8989);
server.listen();
}
}
-
1
-
2
-
3
-
4
-
5
-
6
-
7
-
8
-
9
-
10
-
11
-
12
-
13
-
14
-
15
-
16
-
17
-
18
-
19
-
20
-
21
-
22
-
23
-
24
-
25
-
26
-
27
-
28
-
29
-
30
-
31
-
32
-
33
-
34
-
35
-
36
-
37
-
38
-
39
-
40
-
41
-
42
-
43
-
44
-
45
-
46
-
47
-
48
-
49
-
50
-
51
-
52
-
53
-
54
-
55
-
56
-
57
-
58
-
59
-
60
-
61
-
62
-
63
-
64
-
65
-
66
-
67
-
68
-
69
-
70
-
71
-
72
-
73
-
74
-
75
-
76
-
77
-
78
-
79
-
80
-
81
-
82
-
83
-
84
-
85
-
86
NIO客户端:
package c18; import java.io.IOException; import java.net.InetSocketAddress; import java.nio.ByteBuffer; import java.nio.channels.SelectionKey; import java.nio.channels.Selector; import java.nio.channels.SocketChannel; import java.util.Iterator; public class NIOClient { private Selector selector; /**
* * // 获得一个Socket通道,并对该通道做一些初始化的工作 * @param ip 连接的服务器的ip // * @param port
* 连接的服务器的端口号 * @throws IOException
*/ public void initClient(String ip, int port) throws IOException { SocketChannel channel = SocketChannel.open(); channel.configureBlocking(false); this.selector = Selector.open(); channel.connect(new InetSocketAddress(ip, port)); channel.register(selector, SelectionKey.OP_CONNECT);
} /**
* * // 采用轮询的方式监听selector上是否有需要处理的事件,如果有,则进行处理 * @throws // IOException
* @throws Exception
*/ @SuppressWarnings("unchecked") public void listen() throws Exception { while (true) { selector.select(); Iterator ite = this.selector.selectedKeys().iterator(); while (ite.hasNext()) {
SelectionKey key = (SelectionKey) ite.next(); ite.remove(); if (key.isConnectable()) {
SocketChannel channel = (SocketChannel) key.channel(); if (channel.isConnectionPending()) {
channel.finishConnect();
} channel.configureBlocking(false); channel.write(ByteBuffer.wrap(new String("hello server!").getBytes())); channel.register(this.selector, SelectionKey.OP_READ); } else if (key.isReadable()) {
read(key);
}
}
}
} private void read(SelectionKey key) throws Exception {
SocketChannel channel = (SocketChannel) key.channel(); ByteBuffer buffer = ByteBuffer.allocate(10);
channel.read(buffer); byte[] data = buffer.array();
String msg = new String(data).trim();
System.out.println("client receive msg from server:" + msg);
ByteBuffer outBuffer = ByteBuffer.wrap(msg.getBytes());
channel.write(outBuffer);
} /**
* * // 启动客户端测试 * @throws IOException
* @throws Exception
*/ public static void main(String[] args) throws Exception {
NIOClient client = new NIOClient();
client.initClient("localhost", 8989);
client.listen();
}
}
-
1
-
2
-
3
-
4
-
5
-
6
-
7
-
8
-
9
-
10
-
11
-
12
-
13
-
14
-
15
-
16
-
17
-
18
-
19
-
20
-
21
-
22
-
23
-
24
-
25
-
26
-
27
-
28
-
29
-
30
-
31
-
32
-
33
-
34
-
35
-
36
-
37
-
38
-
39
-
40
-
41
-
42
-
43
-
44
-
45
-
46
-
47
-
48
-
49
-
50
-
51
-
52
-
53
-
54
-
55
-
56
-
57
-
58
-
59
-
60
-
61
-
62
-
63
-
64
-
65
-
66
-
67
-
68
-
69
-
70
-
71
-
72
-
73
-
74
-
75
-
76
-
77
-
78
-
79
-
80
-
81
-
82
-
83
-
84
-
85
服务端和客户端各自维护一个管理通道的对象,我们称之为selector,该对象能检测一个或多个通道 上的事件。我们以服务端为例,如果服务端的selector上注册了读事件,某时刻客户端给服务端发送了一些数据,阻塞I/O这时会调用read()方法阻塞地读取数据,而NIO的服务端会在selector中添加一个读事件。服务端的处理线程会轮询地访问selector,如果访问selector时发现有感兴趣的事件到达,则处理这些事件,如果没有感兴趣的事件到达,则处理线程会一直阻塞直到感兴趣的事件到达为止。
参考文献
感激在Java道路上孜孜不倦探求的前辈们: