1.yaml配置如下
以下配置了两个不同的rabbitMq服务器,每一个rabbitMq服务器对应多个队列,还配置了两个相同的rabbitMq服务器,只不过两个相同的rabbitMq服务器有不同的交换机,都是一个rabbitMq服务器可以对应相同的一套配置,代码功能服用性强,也方便快捷
## 配置需要保证唯一不重复(eqps中的每一的index唯一,一般配置成递增的,队列交换机绑定关系的bean注入都是根据rps的List下标+eqps中index下标注入保证了唯一性)zlf:rabbit:rps:## 如果virtual-host不同,在配置一个即可,addresses不同也是可以在配置,eqps的下标以之对应上即可- rabbitmq:virtual-host: /dyict-uataddresses: 192.168.40.61port: 5672username: "admin"password: "admin"- rabbitmq:virtual-host: /testaddresses: 192.168.40.60port: 5672username: "admin"password: "admin"- rabbitmq:virtual-host: /test2addresses: 192.168.40.60port: 5672username: "admin"password: "admin"eqps:## 下标递增且唯一- index: 0eqs:- function-type: Delaydelay-type: 1exchange-type: customexchange-name: zlf.delay.test1queue-name: delay.test1routing-key: delay.test1.keyexchange-args:x-delayed-type: directqueue-args: {}- function-type: Normaldelay-type: 0exchange-type: directexchange-name: zlf.normal.test1queue-name: normal.test1routing-key: normal.test1.keyexchange-args: {}queue-args: {}- function-type: Delaydelay-type: 2exchange-type: directexchange-name: zlf.delay.test2queue-name: delay.test2## 不用监听正常的队列,直接根据同一个路由键去路由,然后监听死信队列routing-key: zlf.delay-test2-keydlx-exchange-name: zlf.dlx-test1dlx-exchange-type: directdlx-queue-name: dlx-test1dlx-key: zlf.dlx-test1-keyexchange-args: {}queue-args:x-dead-letter-exchange: zlf.dlx-test1x-dead-letter-routing-key: zlf.dlx-test1-key## 单位毫秒 30sx-message-ttl: 30000- function-type: Delaydelay-type: 3exchange-type: directexchange-name: zlf.delay.test3queue-name: delay.test3routing-key: zlf.delay-test3-keyexchange-args: {}queue-args: {}- index: 1eqs:- function-type: Delaydelay-type: 1exchange-type: customexchange-name: zlf.delay.test1queue-name: delay.test1routing-key: delay.test1.keyexchange-args:x-delayed-type: directqueue-args: {}- function-type: Normaldelay-type: 0exchange-type: directexchange-name: zlf.normal.test1queue-name: normal.test1routing-key: normal.test1.keyexchange-args: {}queue-args: {}- function-type: Delaydelay-type: 2exchange-type: directexchange-name: zlf.delay.test2queue-name: delay.test2## 不用监听正常的队列,直接根据同一个路由键去路由,然后监听死信队列routing-key: zlf.delay-test2-keydlx-exchange-name: zlf.dlx-test1dlx-exchange-type: directdlx-queue-name: dlx-test1dlx-key: zlf.dlx-test1-keyexchange-args: {}queue-args:x-dead-letter-exchange: zlf.dlx-test1x-dead-letter-routing-key: zlf.dlx-test1-key## 单位毫秒 30sx-message-ttl: 30000- function-type: Delaydelay-type: 3exchange-type: directexchange-name: zlf.delay.test3queue-name: delay.test3routing-key: zlf.delay-test3-keyexchange-args: {}queue-args: {}- index: 2eqs:- function-type: Delaydelay-type: 1exchange-type: customexchange-name: zlf.delay.test1queue-name: delay.test1routing-key: delay.test1.keyexchange-args:x-delayed-type: directqueue-args: {}- function-type: Normaldelay-type: 0exchange-type: directexchange-name: zlf.normal.test1queue-name: normal.test1routing-key: normal.test1.keyexchange-args: {}queue-args: {}- function-type: Delaydelay-type: 2exchange-type: directexchange-name: zlf.delay.test2queue-name: delay.test2## 不用监听正常的队列,直接根据同一个路由键去路由,然后监听死信队列routing-key: zlf.delay-test2-keydlx-exchange-name: zlf.dlx-test1dlx-exchange-type: directdlx-queue-name: dlx-test1dlx-key: zlf.dlx-test1-keyexchange-args: {}queue-args:x-dead-letter-exchange: zlf.dlx-test1x-dead-letter-routing-key: zlf.dlx-test1-key## 单位毫秒 30sx-message-ttl: 30000- function-type: Delaydelay-type: 3exchange-type: directexchange-name: zlf.delay.test3queue-name: delay.test3routing-key: zlf.delay-test3-keyexchange-args: {}queue-args: {}
2.引入pom依赖如下
2.1 引入项目resources下libs中的jar包依赖如下
<dependency><groupId>org.zlfgroupId><artifactId>rabbitmq-spring-boot-startartifactId><version>1.0-SNAPSHOTversion><scope>systemscope><systemPath>${pom.basedir}/src/main/resources/libs/rabbitmq-spring-boot-start-1.0-SNAPSHOT.jarsystemPath>dependency>
2.2引入maven私服依赖如下
<dependency><groupId>org.zlfgroupId><artifactId>rabbitmq-spring-boot-startartifactId><version>1.0-SNAPSHOTversion>dependency>
3.启动类配置如下
@EnableZlfRabbitMq@Import(value = {RabbitService.class, ZlfMqSpringUtils.class})@SpringBootApplication(exclude = {RabbitAutoConfiguration.class})
4.项目中测试发送消息如下
rabbitService.sendMsg6(0, 0, msg);rabbitService.sendMsg6(1, 0, msg);rabbitService.sendMsg6(2, 0, msg);,,,,,,,,,,
00 / 01 /1110 / 11 /1220 / 21 /22
package xxxx.controller;import com.dy.corporate.member.utils.SpringUtils;import com.zlf.constants.ZlfMqRegistrarBeanNamePrefix;import com.zlf.service.RabbitService;import lombok.extern.slf4j.Slf4j;import org.springframework.amqp.rabbit.core.RabbitTemplate;import org.springframework.beans.factory.annotation.Autowired;import org.springframework.web.bind.annotation.GetMapping;import org.springframework.web.bind.annotation.RequestMapping;import org.springframework.web.bind.annotation.RequestParam;import org.springframework.web.bind.annotation.RestController;public class RabbitMqTestController {private RabbitService rabbitService;public String sendDelayMsg( String msg) {log.info("sendDelayMsg.msg:{}", msg);RabbitTemplate rabbitTemplate = (RabbitTemplate) SpringUtils.getBean(ZlfMqRegistrarBeanNamePrefix.rabbitTemplatePrefix + 0);rabbitService.sendDelayed(rabbitTemplate, "zlf.delay.test1", "delay.test1.key", msg, 10);return "ok";}public String sendDelayMsg2( String msg) {log.info("sendDelayMsg2.msg:{}", msg);rabbitService.sendMsg6(0, 0, msg);return "ok";}public String sendNormalMsg( String msg) {log.info("sendNormalMsg.msg:{}", msg);RabbitTemplate rabbitTemplate = (RabbitTemplate) SpringUtils.getBean(ZlfMqRegistrarBeanNamePrefix.rabbitTemplatePrefix + 0);rabbitService.sendMsg(rabbitTemplate, "zlf.delay.test1", "delay.test1.key", msg);return "ok";}public String sendNormalMsg2( String msg) {log.info("sendNormalMsg2.msg:{}", msg);rabbitService.sendMsg6(0, 1, msg);return "ok";}public String sendDelayDlxMsg( String msg) {log.info("sendDelayDlxMsg.msg:{}", msg);RabbitTemplate rabbitTemplate = (RabbitTemplate) SpringUtils.getBean(ZlfMqRegistrarBeanNamePrefix.rabbitTemplatePrefix + 0);//正常发延迟交换机和延迟队列的路由键rabbitService.sendDelayed(rabbitTemplate, "zlf.delay.test2", "zlf.delay-test2-key", msg, 10);return "ok";}public String sendDelayDlxMsg2( String msg) {log.info("sendDelayDlxMsg2.msg:{}", msg);//正常发延迟交换机和延迟队列的路由键rabbitService.sendDelayed6(0, 2, msg,10);return "ok";}public String sendDelayMsg3( String msg) {log.info("sendDelayMsg3.msg:{}", msg);rabbitService.sendDelayed6(0, 3, msg, 10);return "ok";}}
项目utils下放入SpringUtils类:
package xxx.utils;import org.slf4j.Logger;import org.slf4j.LoggerFactory;import org.springframework.beans.BeansException;import org.springframework.context.ApplicationContext;import org.springframework.context.ApplicationContextAware;import org.springframework.stereotype.Component;/*** @author zlf* @description spring上下文工具类* @date 2024/03/11**/public class SpringUtils implements ApplicationContextAware {private static final Logger logger = LoggerFactory.getLogger(SpringUtils.class);private static ApplicationContext applicationContext;public void setApplicationContext(ApplicationContext applicationContext) throws BeansException {logger.info("应用程序上下文 : [{}]", "开始初始化");SpringUtils.applicationContext = applicationContext;logger.info("应用程序上下文 : [{}]", "初始化完成");}/*** 获取applicationContext*发给* @return*/public static ApplicationContext getApplicationContext() {return applicationContext;}/*** 通过name获取 Bean.** @param name* @return*/public static Object getBean(String name) {return getApplicationContext().getBean(name);}/*** 通过class获取Bean.** @param clazz* @param* @return*/public staticT getBean(Class clazz) {return getApplicationContext().getBean(clazz);}/*** 通过name,以及Clazz返回指定的Bean** @param name* @param clazz* @param* @return*/public staticT getBean(String name, Class clazz) {return getApplicationContext().getBean(name, clazz);}}
5.项目中消费消息代码示例
package xxx.listener;import com.rabbitmq.client.Channel;import com.zlf.constants.ZlfMqRegistrarBeanNamePrefix;import lombok.extern.slf4j.Slf4j;import org.springframework.amqp.core.ExchangeTypes;import org.springframework.amqp.core.Message;import org.springframework.amqp.rabbit.annotation.Exchange;import org.springframework.amqp.rabbit.annotation.Queue;import org.springframework.amqp.rabbit.annotation.QueueBinding;import org.springframework.amqp.rabbit.annotation.RabbitHandler;import org.springframework.amqp.rabbit.annotation.RabbitListener;import org.springframework.stereotype.Component;import java.io.IOException;/*** 手动ack业务demo* long deliveryTag = message.getMessageProperties().getDeliveryTag();* try {* int a = 1/0;* User user = JSONObject.parseObject(userStr,User.class);* log.info(user.toString());* //手动ack 第二个参数为false是表示仅仅确认当前消息 true表示确认之前所有的消息* channel.basicAck(deliveryTag,false);* } catch (Exception e) {* //手动nack 告诉rabbitmq该消息消费失败 第三个参数:如果被拒绝的消息应该被重新请求,而不是被丢弃或变成死信,则为true* try {* channel.basicNack(deliveryTag,false,false);* } catch (IOException ex) {* throw new RuntimeException("消息处理失败");* }* }* //channel.basicNack(); 不ack* //channel.basicReject(); 拒绝*/4jpublic class MqConsumer {/*** 延迟插件实现延迟队列监听队列消息** @param message* @param channel* @throws IOException*/(queues = "delay.test1", containerFactory = ZlfMqRegistrarBeanNamePrefix.simpleRabbitListenerContainerFactory + 0)public void mqConsumer1(Message message, Channel channel) throws IOException {String msg = new String(message.getBody(), "UTF-8");try {log.info("mqConsumer1=====>msg:{}", msg);} catch (Exception e) {log.error("mqConsumer1消费异常:{}", e.getMessage());} finally {channel.basicAck(message.getMessageProperties().getDeliveryTag(), true);}//channel.basicNack(); 不ack//channel.basicReject(); 拒绝}/*** 普通队列监听队列消息** @param message* @param channel* @throws IOException*/(queues = "normal.test1", containerFactory = ZlfMqRegistrarBeanNamePrefix.simpleRabbitListenerContainerFactory + 0)public void mqConsumer2(Message message, Channel channel) throws IOException {String msg = new String(message.getBody(), "UTF-8");try {log.info("mqConsumer2=====>msg:{}", msg);} catch (Exception e) {log.error("mqConsumer2消费异常:{}", e.getMessage());} finally {channel.basicAck(message.getMessageProperties().getDeliveryTag(), true);}}/*** TTL + 死信队列实现延迟队列监听延迟队列消息(此处省略)* 绑定的那个延迟队列,消息如果正常消费,则不会将消息投递到死信队列上,* 只有消息变成死信才会被投递到死信队列上*//*** TTL + 死信队列实现延迟队列监听死信队列消息* 成为死信的条件* * 1.队列消息长度到达限制。* * 2.消费者拒接消费消息,basicNack/basicReject,并且不把消息重新放入原目标队列,requeue=false。* * 3.原队列存在消息过期设置,消息到达超时时间未被消费。** @param message* @param channel* @throws IOException*/(//监听连接工程指定containerFactory = ZlfMqRegistrarBeanNamePrefix.simpleRabbitListenerContainerFactory + 0,bindings = (//延迟交换机exchange = (value = "zlf.delay.test2",//持久化参数设置durable = "true",//交换机类型指定type = ExchangeTypes.DIRECT),//延迟交换机路由延迟队列的keykey = "zlf.delay-test2-key",//死信队列value = (value = "dlx-test1",//持久化参数设置durable = "true"//, //autoDelete = "false",)//ignoreDeclarationExceptions = "true")//,//concurrency = "1", // 指定监听该队列的消费者个数//ackMode = "MANUAL"// 手动ack)public void mqConsumer4(Message message, Channel channel) throws IOException {String msg = new String(message.getBody(), "UTF-8");try {log.info("mqConsumer4=====>msg:{}", msg);} catch (Exception e) {log.error("mqConsumer4:{}", e.getMessage());} finally {channel.basicAck(message.getMessageProperties().getDeliveryTag(), true);}}/*** 延迟交换机 + 消息设置setHeader("x-delay", xxx)** @param message* @param channel* @throws IOException*/(queues = "delay.test3", containerFactory = ZlfMqRegistrarBeanNamePrefix.simpleRabbitListenerContainerFactory + 0)public void mqConsumer5(Message message, Channel channel) throws IOException {String msg = new String(message.getBody(), "UTF-8");try {log.info("mqConsumer5=====>msg:{}", msg);} catch (Exception e) {log.error("mqConsumer5消费异常:{}", e.getMessage());} finally {channel.basicAck(message.getMessageProperties().getDeliveryTag(), true);}//channel.basicNack(); 不ack//channel.basicReject(); 拒绝}}
6.mq管理后台交换机队列创建及路由绑定关系如下
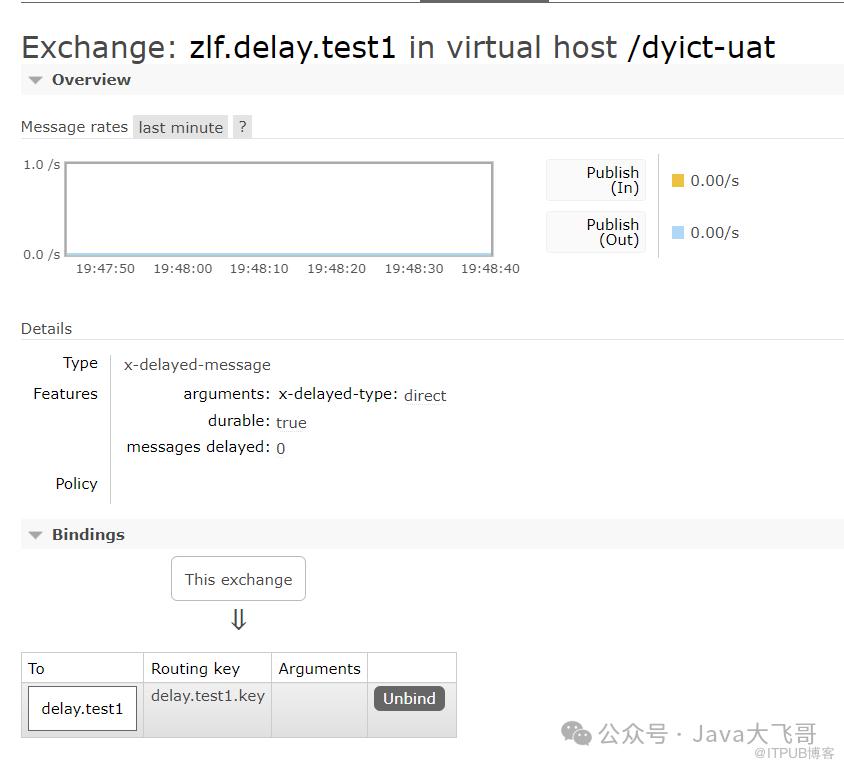
zlf.delay.test1交换机(延迟插件)
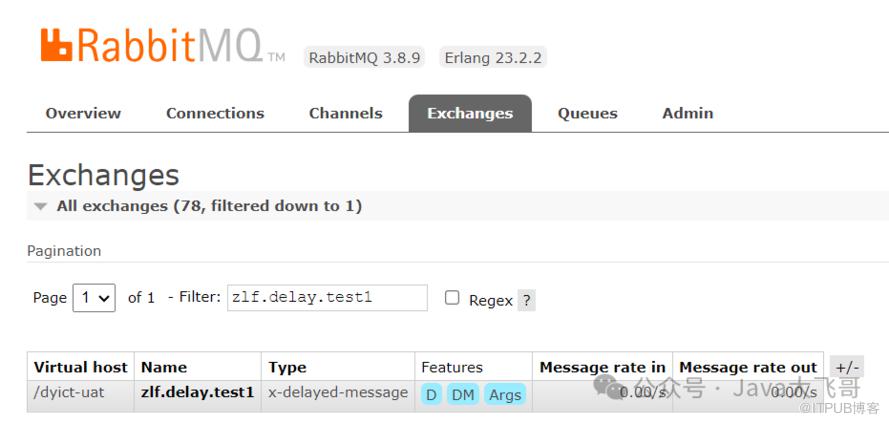
zlf.delay.test1交换和delay.test1队列的绑定关系:
zlf.normal.test1交换机(普通交换机)
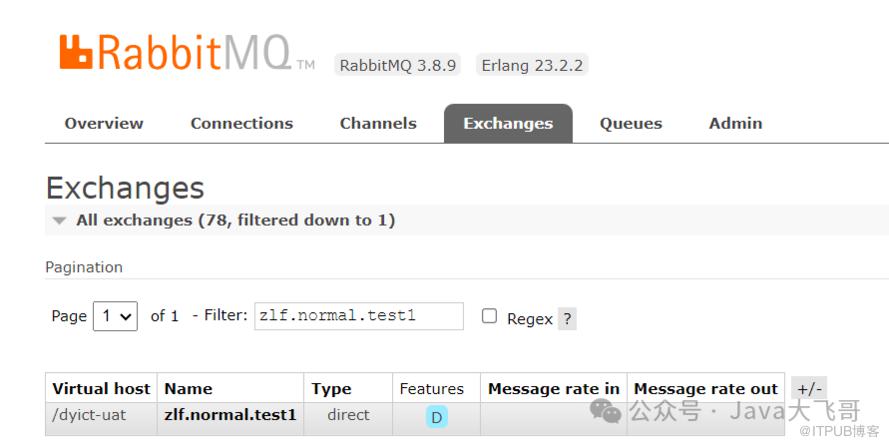
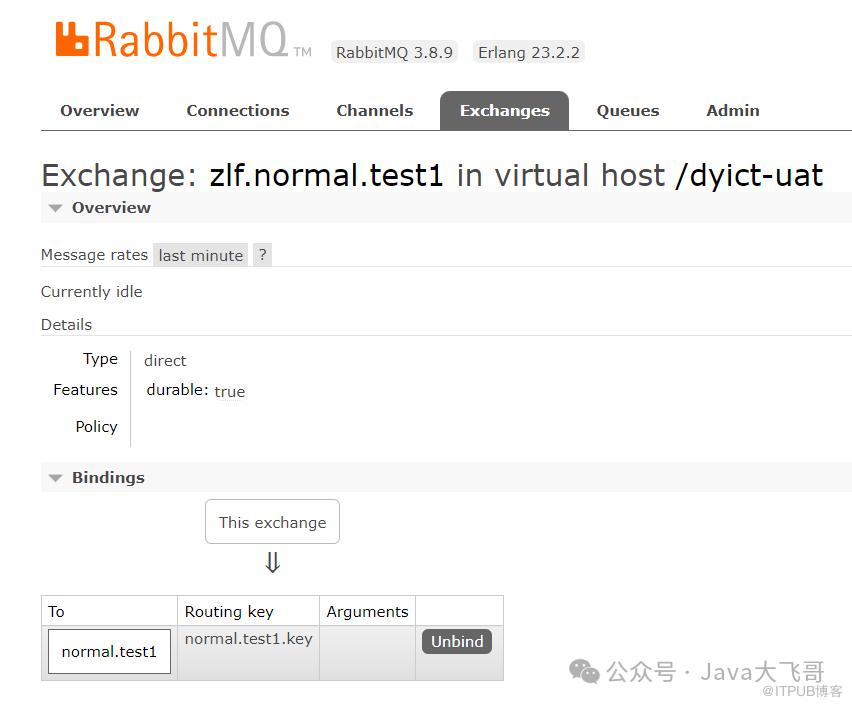
zlf.normal.test1交换机和normal.test1的绑定关系:
zlf.delay.test2交换机:(ttl + 死信队列)
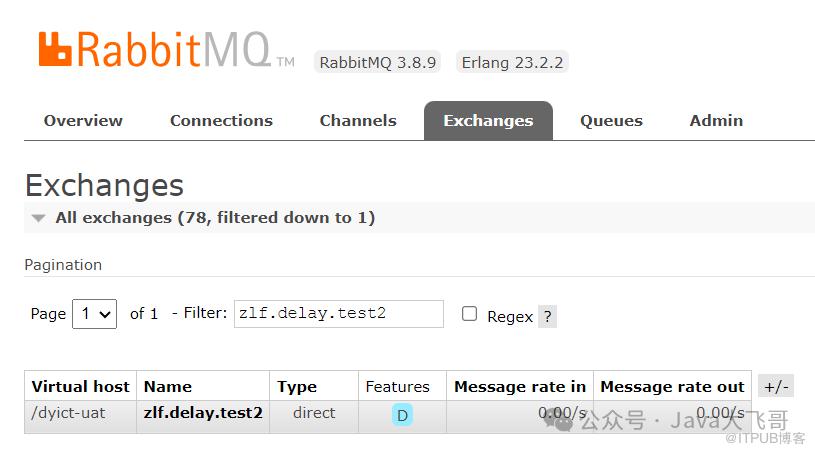
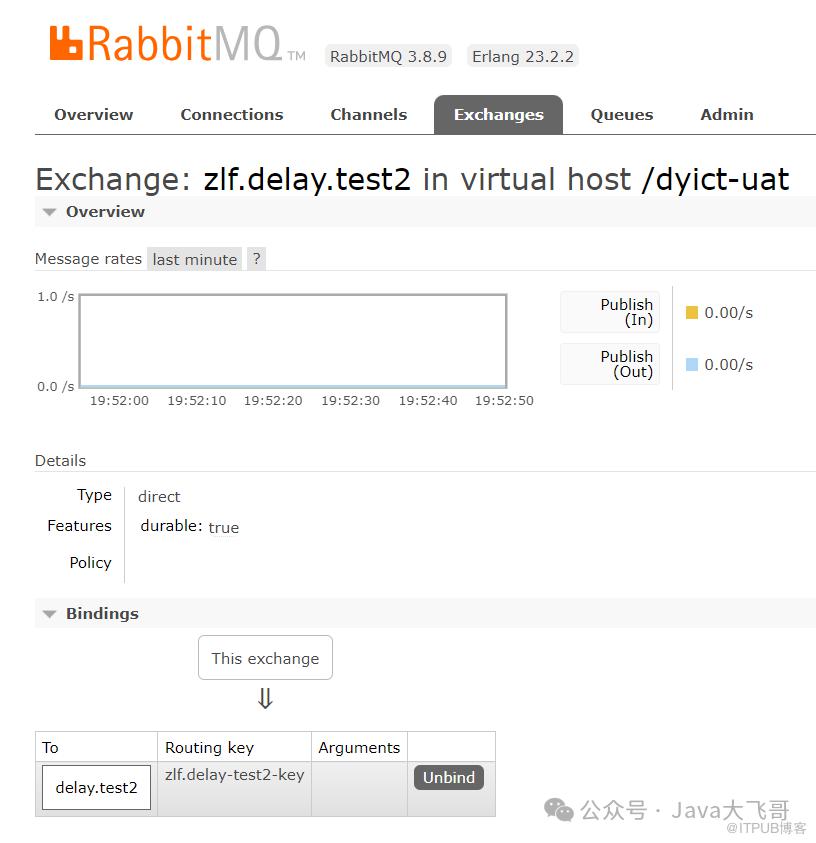
zlf.delay.test2交换机和delay.test2绑定关系:
zlf.dlx-test1交换机:(死信交换机)
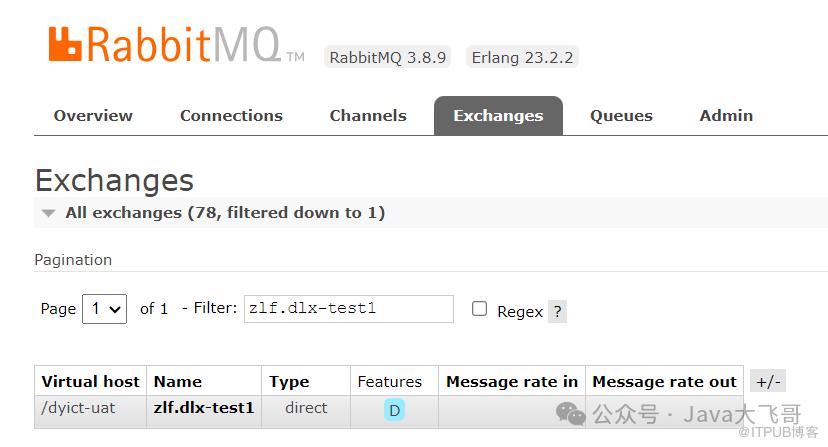
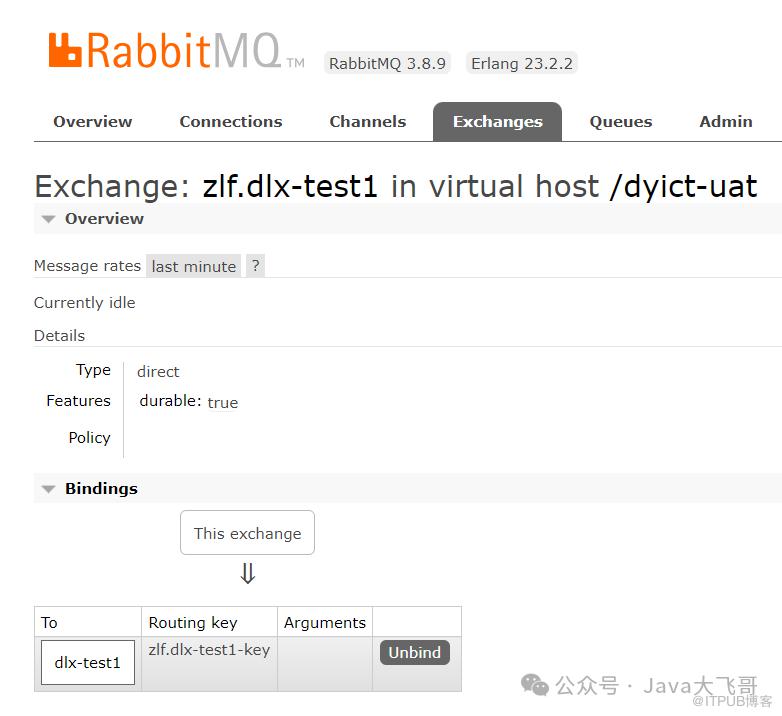
zlf.dlx-test1死信交换机和dlx-test1绑定关系:
zlf.delay.test3交换机:
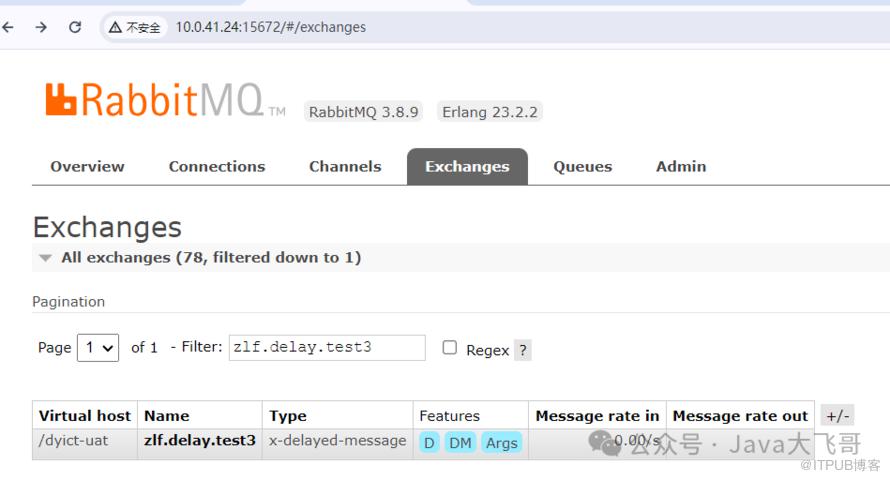
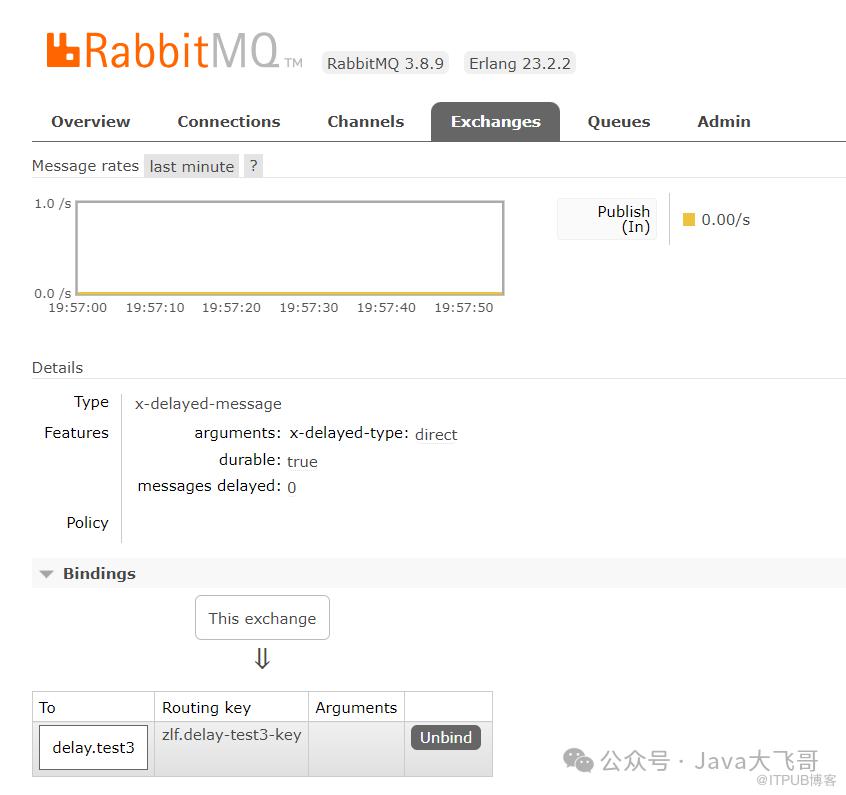
zlf.delay.test3交换机delay.test3的绑定关系:
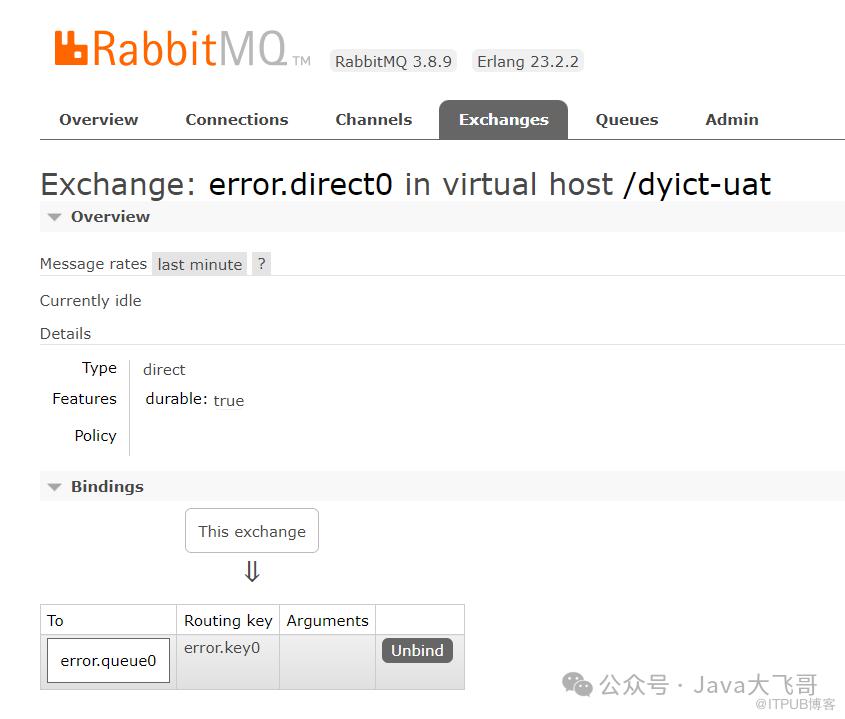
error交换机
error.direct + 一个下标,类型、路由键是固定
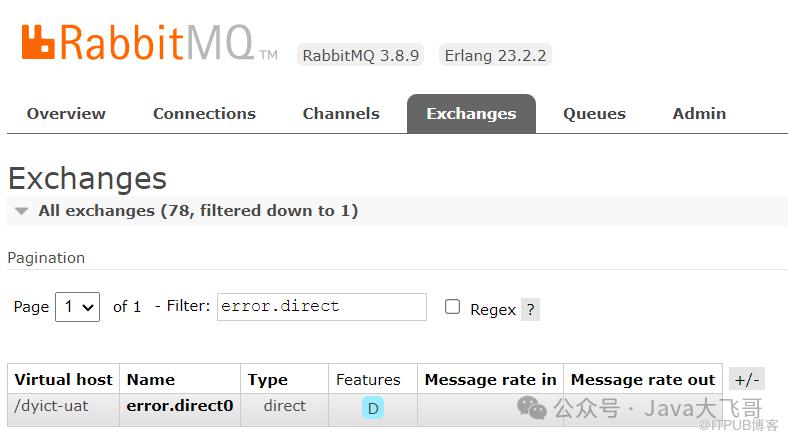
error.direct + 一个下标 和 error.queue+ 一个下标 的绑定关系: