人脸检测的介绍
人脸检测数据集
人脸检测的算法
模型训练与评估
模型保存与测试
模型部署与应用
—01—
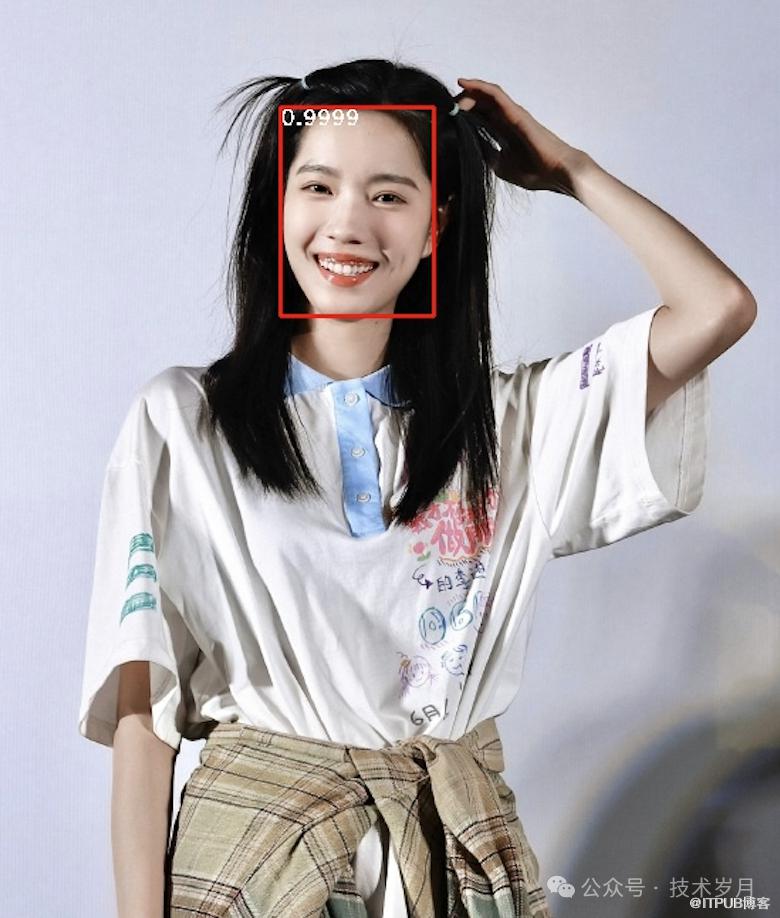
【人脸检测:单张人脸】
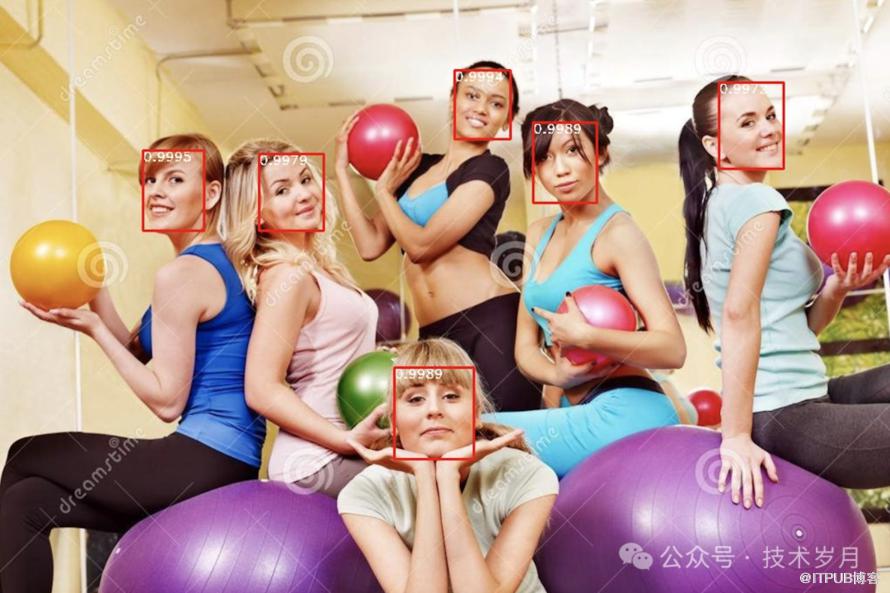
【人脸检测:多张人脸】
# Face Check API response
{
  "faces": [
    {
      "confidence": 99.371,
      "face_rectangle": {
        "x": 230,
        "y": 169,
        "height": 546,
        "width": 376
      }
    },
    {
      "confidence": 99.895,
      "face_rectangle": {
        "x": 530,
        "y": 369,
        "height": 245,
        "width": 230
      }
    }
  ]
}
▌应用场景

【面部解锁】
【相册人脸分类搜索】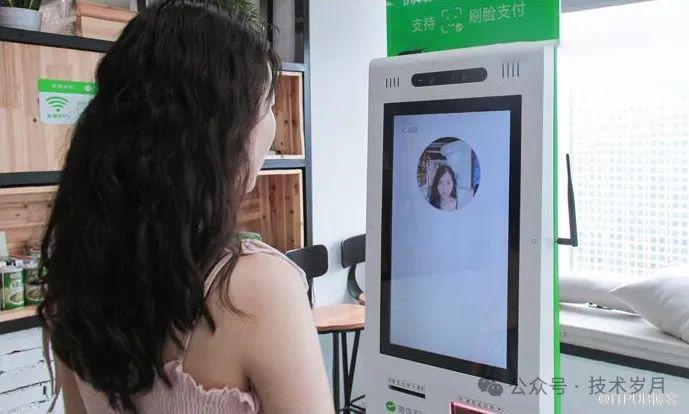
【刷脸支付】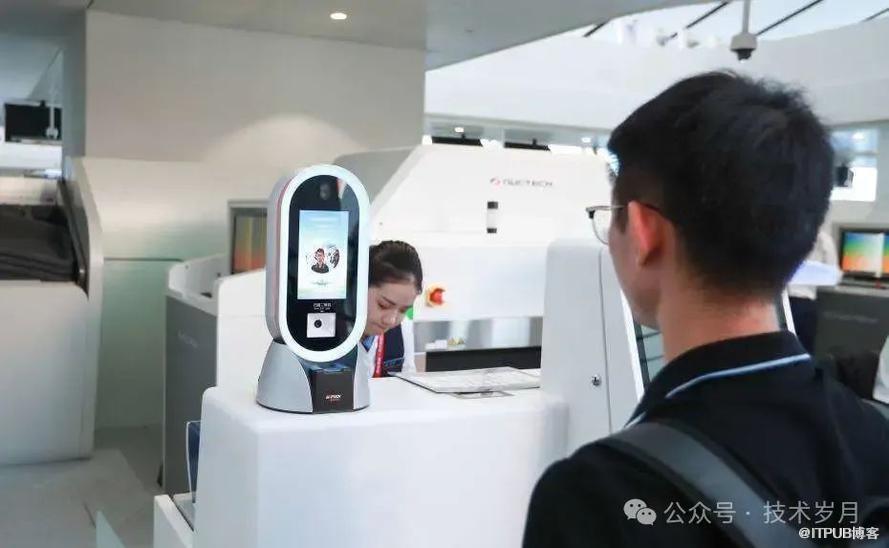
【刷脸安检】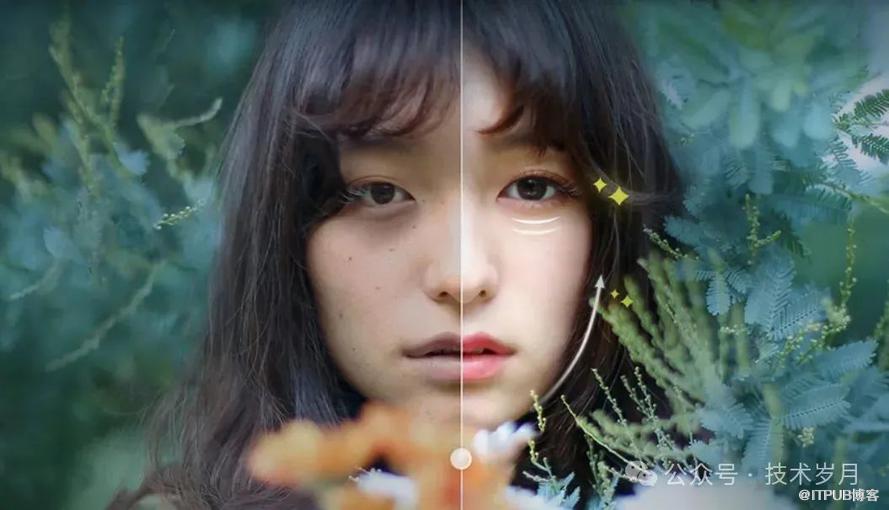
【人脸美颜】
▌困难挑战
人脸检测器的性能受到多种因素的干扰,比如遮挡、光照变化、肤色差异、姿势多样性、面部表情、配饰、妆容、口罩、面部比例和图像质量。此外,背景复杂度、分辨率、运动模糊和摄像头角度也会影响检测结果。这些因素可能导致检测器难以准确识别人脸,影响其在实际应用中的表现。
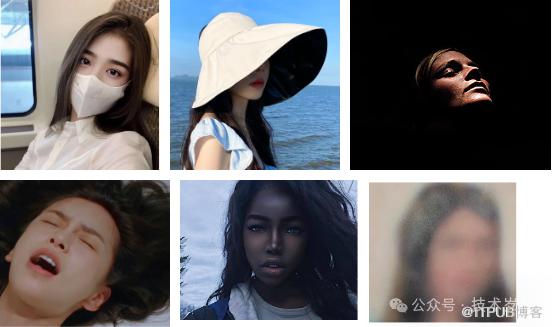
【人脸检测的挑战】
—02—
人脸检测数据集
工欲善其事必先利其器,AI领域,优质的数据就是成功的关键。在计算机视觉中的人脸图像检测领域,前人已经构建并开源了许多优秀的数据集供研究和使用。其中,AFW、FDDB和WIDER FACE是推荐最好用的基准数据集,并有相应的评估标准(Benchmark)用于评估和比较人脸检测算法的性能。
包含205个图像,共473个标注的人脸。
图像来自Flickr,具有多样化的背景和姿态。
每个人脸标注了边界框、5个关键点(眼睛、鼻尖、嘴角)和姿态信息(俯仰、偏航、滚动角度)。
应用场景:
Face detection, pose estimation, and landmark localization in the wild [1]
http://vis-www.cs.umass.edu/lfw/index.html
包含2845张图像,共5171个标注的人脸。
图像来自新闻、网络和个人相册,具有多样化的背景、姿态和光照条件。
标注了椭圆形的边界框 (而不是矩形边界框),更加符合实际人脸的形状。
应用场景:
FDDB: A Benchmark for Face Detection in Unconstrained Settings [2]
https://vis-www.cs.umass.edu/fddb/index.html
包含32,203张图像,共393,703个标注的人脸。
图像来自互联网,具有极高的多样性,包括不同的姿态、遮挡、光照和分辨率。
标注了矩形的边界框。
应用场景:
WIDER FACE: A Face Detection Benchmark [3]
数据下载地址:
http://shuoyang1213.me/WIDERFACE/index.html
| 数据集 | AFW | FDDB | WIDER FACE |
|---|---|---|---|
| 图像数量 | 205 | 2845 | 32,203 |
| 人脸数量 | 473 | 5171 | 393,703 |
| 标注类型 | 矩形边界框、5个关键点、姿态信息 | 矩形边界框 | |
| 图像来源 | Flickr | 新闻、网络、个人相册 | 互联网 |
| 多样性 | 中等 | 高 | 极高 |
| 应用场景 | 人脸检测、姿态估计 | 人脸检测 | 人脸检测 |
综合来看,WIDER FACE数据集因其极高的多样性和复杂性,通常被认为是评估人脸检测算法性能的最佳选择之一。此外还有一些数据集可以根据不同的场景任务需求使用,PASCAL FACE(人脸检测)、LFW(人脸识别)、CelebA(人脸属性)、MAFA(戴口罩人脸检测)等。
▌自建数据集
OpenCV(Open Source Computer Vision Library)是一个开源的计算机视觉和机器学习软件库。它提供了数千个优化的算法,用于实时计算机视觉应用。OpenCV提供了丰富的图像处理功能,如图像缩放、旋转、裁剪等。
!pip install opencv-python
import cv2
# 读取图像
image = cv2.imread('path_to_image.jpg')
# 显示图像
cv2.imshow('Image', image)
!pip install dlib
import dlib
# 加载人脸检测器
detector = dlib.get_frontal_face_detector()
# 检测人脸
faces = detector(image)
for face in faces:
    x, y, w, h = face.left(), face.top(), face.width(), face.height()
!pip install labelme!labelme #打开Labelme GUI
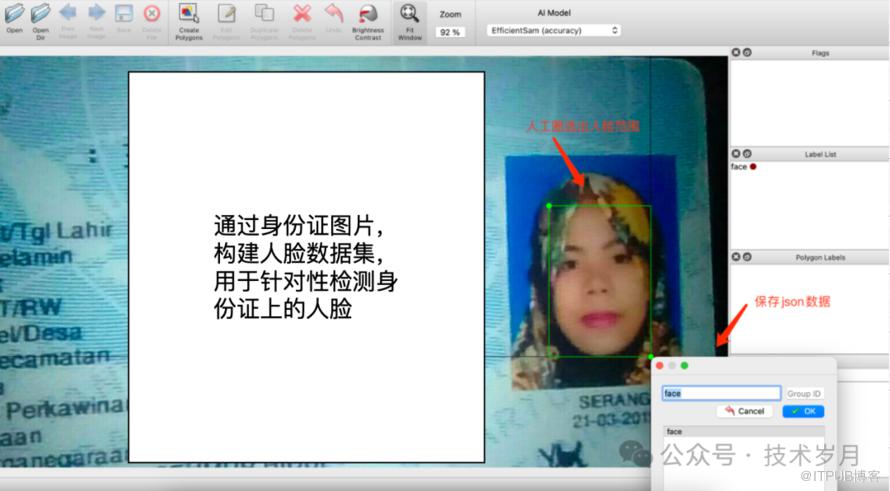
"points": [[254.15094339622635,178.188679245283],[608.8679245283017,712.1509433962264]]#取整xx.jpg 1 254 178 609 712
—03—
▌MTCNN
相关论文:
Joint face detection and alignment using multitask cascaded convolutional networks [4]
网络结构:
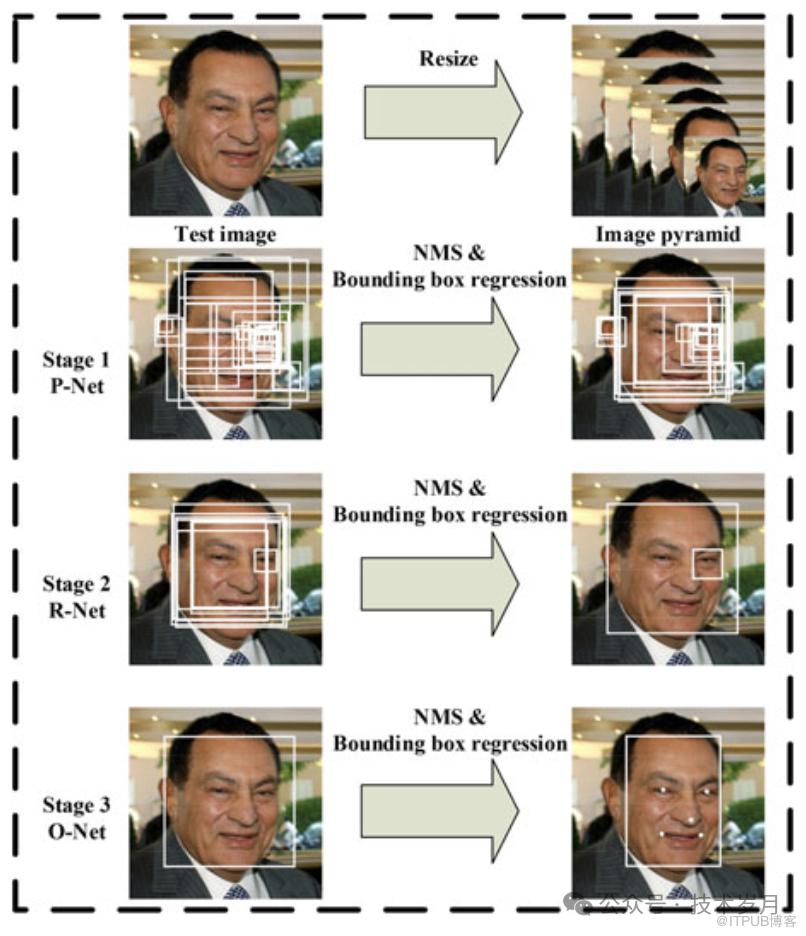
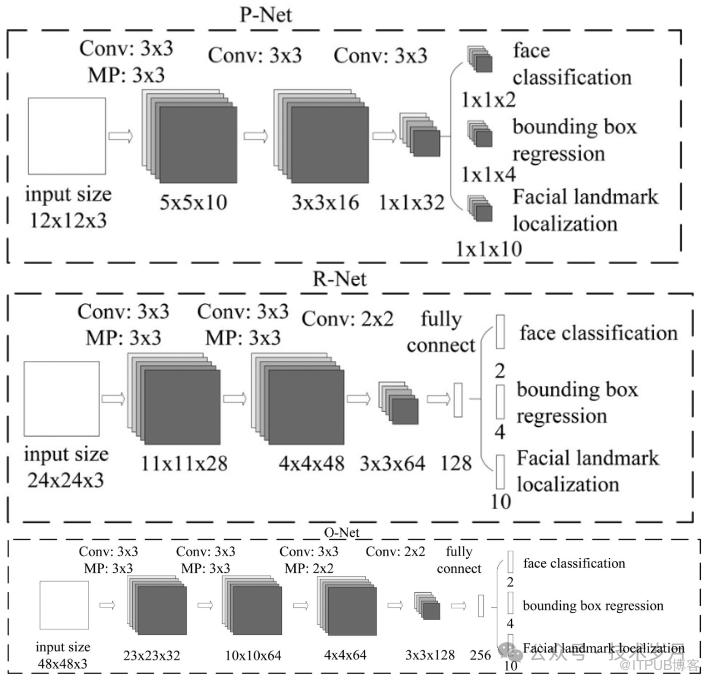
【MTCNN三阶段网络结构】
MTCNN 网络分为三个阶段:
P-Net(Proposal Network): 生成初步的人脸候选框。
R-Net(Refine Network): 对 P-Net 生成的候选框进行筛选和精细化。
O-Net(Output Network): 最终确认人脸位置并预测关键点。
Retinaface: Single-stage dense face localisation in the wild [5]
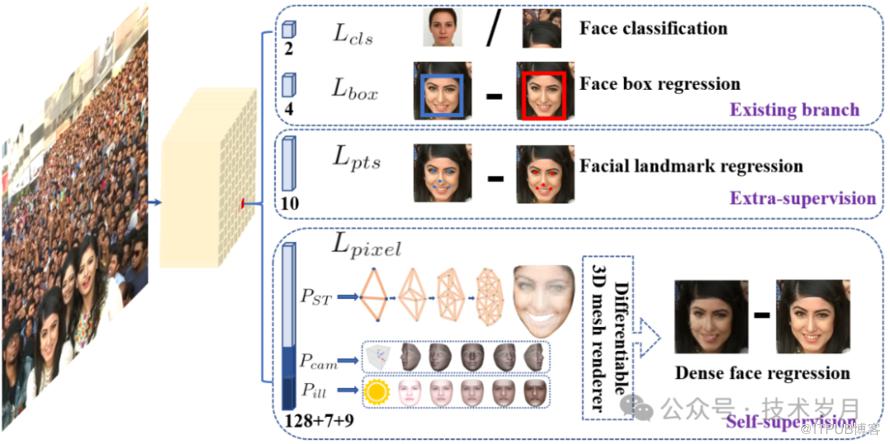
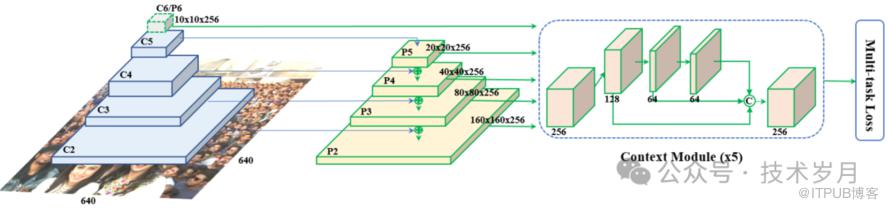
【RetinaFace网络结构】
1. 输入层:这是网络的起点,接收原始图像。
2. 主干网络(Backbone Network):这一部分通常使用预训练的卷积神经网络,它的任务是提取图像的基本特征。可以想象成是一个专门用来识别图像中基本形状和纹理的“专家”。
3. 特征金字塔网络(FPN):接下来,特征会被送入 FPN,这个网络能从不同尺度上分析图像特征,就像是拥有多层放大镜,能同时关注大人脸和小人脸。
4. 检测头(Detection Head):在这个阶段,网络会生成一系列的“候选框”,每个框都可能包含一张人脸。检测头会像一个精明的侦探,逐一检查这些框,判断哪些是真正的人脸。
5. 关键点定位分支:这是一个专门识别人脸关键点的部分。它会在每张被识别出的人脸上标记出眼睛、鼻子、嘴巴等关键位置,确保识别的准确性。
6. 分类和回归层:最后的层负责对每个候选框进行分类(是否是人脸)和回归(调整框的位置和大小),确保最终输出的结果既准确又精确。
MobileNet :是一种轻量级的网络,专为在移动设备和嵌入式系统上高效运行而设计。它通过深度可分离卷积显著减少了参数和计算量,因此在资源受限的环境中能够快速运行,非常适合手机或物联网设备。然而,这种简化也意味着在处理复杂图像时,准确性可能稍逊于更复杂的网络。
参考论文:
参考论文:
Deep Residual Learning for Image Recognition [7]
截至目前为止,RetinaFace 被广泛认为是人脸检测领域的顶尖算法之一,也是工业界首选的算法,所以后续模型训练和使用将选择使用RetinaFace。
—04—
模型训练与评估
https://github.com/biubug6/Pytorch_Retinaface
· System RAM 12.7 GB· GPU RAM 15.0GB· Python 3.10· Torch 2.3.1+cu121· Torchversion 0.18.1+cu121
./data/widerface/train/images/label.txtval/images/wider_val.txt
▌模型训练
parser = argparse.ArgumentParser(description='Retinaface Training')parser.add_argument('--training_dataset', default='./data/widerface/train/label.txt', help='Training dataset directory')parser.add_argument('--network', default='mobile0.25', help='Backbone network mobile0.25 or resnet50')parser.add_argument('--num_workers', default=4, type=int, help='Number of workers used in dataloading')parser.add_argument('--lr', '--learning-rate', default=1e-3, type=float, help='initial learning rate')parser.add_argument('--momentum', default=0.9, type=float, help='momentum')parser.add_argument('--resume_net', default=None, help='resume net for retraining')parser.add_argument('--resume_epoch', default=0, type=int, help='resume iter for retraining')parser.add_argument('--weight_decay', default=5e-4, type=float, help='Weight decay for SGD')parser.add_argument('--gamma', default=0.1, type=float, help='Gamma update for SGD')parser.add_argument('--save_folder', default='./weights/', help='Location to save checkpoint models')
脚本执行有一些默认参数,我们也可以调整,其中重要的几个参数:
training_dataset:对应训练的数据集
network:选择backbone网络(MobileNet/ResNet50),使用默认的ResNet50网络
lr:学习率,学习率决定模型更新的步长
momentum:动量因子,用于加速梯度下降并稳定训练过程。
weight_decay:SGD优化器的权重衰减。
gamma:SGD优化器的学习率衰减因子。
save_folder:保存检查点模型的目录。默认保存目录./weights/
还有一些模型训练调整的参数,打开./data/config.py。
cfg_re50 = {'name': 'Resnet50','min_sizes': [[16, 32], [64, 128], [256, 512]],'steps': [8, 16, 32],'variance': [0.1, 0.2],'clip': False,'loc_weight': 2.0,'gpu_train': False,'batch_size': 24,'ngpu': 0,'epoch': 100,'decay1': 70,'decay2': 90,'image_size': 840,'pretrain': True,'return_layers': {'layer2': 1, 'layer3': 2, 'layer4': 3},'in_channel': 256,'out_channel': 256}
这里可以在训练中调整的几个重要参数:
batch_size: 设置每次迭代的训练样本数量。较大的批量大小可以更稳定地更新梯度,但需要更多的显存。
epoch: 设置训练的总轮数。更多的训练轮数可以让模型更充分地学习数据,但也可能导致过拟合。
image_size: 设置输入图像的尺寸。较大的图像尺寸可能提供更精细的特征,但会增加计算量。
调整完参数后即可开启训练:
!python3 train.py通过输出日志,我们可以跟踪模型的训练进度、性能指标以及预计完成时间。整个训练过程包含10个周期(Epochs),每个周期由403次迭代(Epochiter)组成,总迭代次数为4030次(403*10)。训练结果包括位置损失(Loc)、分类损失(Cla)和关键点损失(Landm)。在训练过程中,目标是使这些损失逐步减少,以提高模型的性能。
▌评价指标
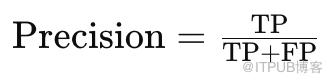
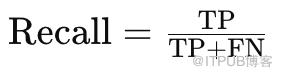
准确率(Accuracy)是指模型正确检测出人脸的比例,其计算公式:

TP (True Positives):正确检测为人脸的正样本数
TN (True Negatives):正确检测为非人脸的负样本数
FP (False Positives):错误检测为人脸的负样本数
FN (False Negatives):未检测出的人脸正样本数

在实际应用中,平均精度(AP)被视为最重要的指标,因为它不仅能反映模型的整体检测准确性,还能揭示模型在处理不同大小、不同位置的人脸时的稳定性和可靠性。
模型评估使用widerface val,加载我们刚训练好的模型参数(xx.pth),执行完成后会在widerface_evaluate目录生成result.txt文件。
!python test_widerface.py --trained_model "path/res_epoch_10.pth" --network resnet50接着进入widerface_evaluate对执行结果进行评估。
%cd ./widerface_evaluate!python setup.py build_ext --inplace!python evaluation.py
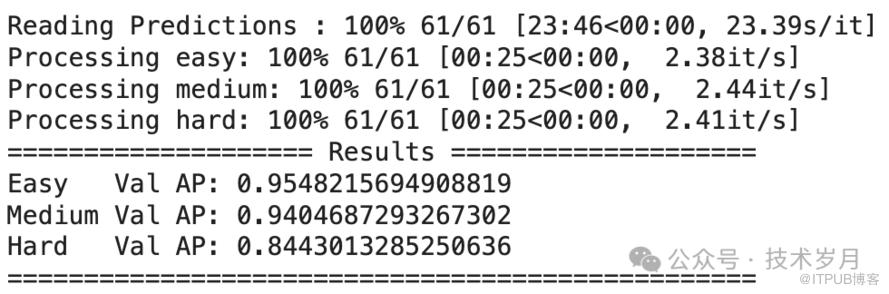
【模型在val测试集上评估结果】
Easy:包含清晰、正面、无遮挡的人脸,是最容易检测的类别。
Medium:包含一些遮挡、较小尺度或轻微倾斜的人脸,检测难度属于中等。
Hard:包含严重遮挡、极小尺度或大角度倾斜的人脸,检测难度最大。
通过不断调整参数,反复评估直到达成最佳性能的模型,然后就可以保存和使用了。
—05—
模型保存与测试
# 加载预训练模型
def load_model(model, pretrained_path, load_to_cpu):
    print('Loading pretrained model from {}'.format(pretrained_path))
    if load_to_cpu:
        pretrained_dict = torch.load(pretrained_path, map_location=lambda storage, loc: storage)
    else:
        device = torch.cuda.current_device()
        pretrained_dict = torch.load(pretrained_path, map_location=lambda storage, loc: storage.cuda(device))
    if "state_dict" in pretrained_dict.keys():
        pretrained_dict = remove_prefix(pretrained_dict['state_dict'], 'module.')
    else:
        pretrained_dict = remove_prefix(pretrained_dict, 'module.')
    # 加载权重
    model.load_state_dict(pretrained_dict, strict=False)
    return model

def remove_prefix(state_dict, prefix):
    print('remove prefix \'{}\''.format(prefix))
    f = lambda x: x.split(prefix, 1)[-1] if x.startswith(prefix) else x
    return {f(key): value for key, value in state_dict.items()}

#预训练模型参数
trained_weigth_path = '/path/resnet50.pth'
cpu = not torch.cuda.is_available() #当前环境没有gpu使用cpu
model = load_model(net, trained_weigth_path, cpu)
model.eval() #设置模型为评估模式
为了测试模型的预测效果,我们打开图片,使用模型进行人脸检测,检测完成后,将结果标注在图片上,以便更直观地观察模型的准确性和效果。

【测试人脸检测模型效果】
首先使用OpenCV打开并预处理图片。图片数据被转换为浮点数格式,并进行归一化处理,即从每个像素的 RGB 值中减去固定的均值 (104, 117, 123)。这一归一化步骤有助于提高模型的检测精度。最后,我们将图片调整为模型输入所需的形状。
# 加载图片并预处理
def preprocess_image(image_path):
  img_raw = cv2.imread(image_path, cv2.IMREAD_COLOR)
  if img_raw is None:
    print('image cant open, check please')
    return
  img = np.float32(img_raw) #转为浮点数
  scale = torch.Tensor([img.shape[1], img.shape[0], img.shape[1], img.shape[0]]) #缩放比例 [width, height, width, height]
  img -= (104, 117, 123) #减去均值进行归一化,RGB 固定104, 117, 123
  img = img.transpose(2, 0, 1) #转置图像维度 维度从 (height, width, channels) 转换为 (channels, height, width)
  img = torch.from_numpy(img).unsqueeze(0) #添加批量维度 形状从 (channels, height, width) 变为 (1, channels, height, width)
  return img, img_raw, scale
# 执行Pytorch模型推理
model = load_model(net, trained_weigth_path, cpu)
def inference_pytorch(model, img):
  model.eval() #设置模型为评估模式
  loc, conf, landms = model(img)
  # loc:位置预测(bounding box location predictions)
  # conf:置信度(confidence scores)
  # landms:关键点(landmark predictions)
  print("loc shape:", loc.shape)
  print("conf shape:", conf.shape)
  print("landms shape:", landms.shape)
  return loc, conf, landms
#生成先验框
class PriorBox(object):
    def __init__(self, cfg, image_size=None, phase='train'):
        super(PriorBox, self).__init__()
        self.min_sizes = cfg['min_sizes']
        self.steps = cfg['steps']
        self.clip = cfg['clip']
        self.image_size = image_size
        self.feature_maps = [[ceil(self.image_size[0]/step), ceil(self.image_size[1]/step)] for step in self.steps]
        self.name = "s"

    def forward(self):
        anchors = []
        for k, f in enumerate(self.feature_maps):
            min_sizes = self.min_sizes[k]
            for i, j in product(range(f[0]), range(f[1])):
                for min_size in min_sizes:
                    s_kx = min_size / self.image_size[1]
                    s_ky = min_size / self.image_size[0]
                    dense_cx = [x * self.steps[k] / self.image_size[1] for x in [j + 0.5]]
                    dense_cy = [y * self.steps[k] / self.image_size[0] for y in [i + 0.5]]
                    for cy, cx in product(dense_cy, dense_cx):
                        anchors += [cx, cy, s_kx, s_ky]
        # back to torch land
        output = torch.Tensor(anchors).view(-1, 4)
        if self.clip:
            output.clamp_(max=1, min=0)
        return output

#解码先验框
def py_cpu_nms(dets, thresh):
    """Pure Python NMS baseline."""
    x1 = dets[:, 0]
    y1 = dets[:, 1]
    x2 = dets[:, 2]
    y2 = dets[:, 3]
    scores = dets[:, 4]
    areas = (x2 - x1 + 1) * (y2 - y1 + 1)
    order = scores.argsort()[::-1]
    keep = []
    while order.size > 0:
        i = order[0]
        keep.append(i)
        xx1 = np.maximum(x1[i], x1[order[1:]])
        yy1 = np.maximum(y1[i], y1[order[1:]])
        xx2 = np.minimum(x2[i], x2[order[1:]])
        yy2 = np.minimum(y2[i], y2[order[1:]])
        w = np.maximum(0.0, xx2 - xx1 + 1)
        h = np.maximum(0.0, yy2 - yy1 + 1)
        inter = w * h
        ovr = inter / (areas[i] + areas[order[1:]] - inter)
        inds = np.where(ovr <= thresh)[0]
        order = order[inds + 1]
    return keep

#解码位置
def decode_loc(loc, priors, variances):
    boxes = torch.cat((
        priors[:, :2] + loc[:, :2] * variances[0] * priors[:, 2:],
        priors[:, 2:] * torch.exp(loc[:, 2:] * variances[1])), 1)
    boxes[:, :2] -= boxes[:, 2:] / 2
    boxes[:, 2:] += boxes[:, :2]
    return boxes
#解码关键点
def decode_landm(pre, priors, variances):
    landms = torch.cat((priors[:, :2] + pre[:, :2] * variances[0] * priors[:, 2:],
                        priors[:, :2] + pre[:, 2:4] * variances[0] * priors[:, 2:],
                        priors[:, :2] + pre[:, 4:6] * variances[0] * priors[:, 2:],
                        priors[:, :2] + pre[:, 6:8] * variances[0] * priors[:, 2:],
                        priors[:, :2] + pre[:, 8:10] * variances[0] * priors[:, 2:],
                        ), dim=1)
    return landms

# 解码预测结果
def decode_results(loc, conf, landms, resize, scale, img_shape):
  im_height = img_shape[2]
  im_width = img_shape[3]
  #### 解码预测结果 #####
  priorbox = PriorBox(cfg, image_size=(im_height, im_width)) #生成先验框(prior boxes),用于帮助模型预测目标的位置
  priors = priorbox.forward() #生成先验框
  prior_data = priors.data #将先验框数据转换为 NumPy 数组
  #解码位置预测,将模型的输出解码为实际的边框坐标
  boxes = decode_loc(torch.tensor(loc[0]), torch.tensor(prior_data), cfg['variance']) #使用先验框和模型的输出(loc[0])解码出实际的边框坐标。cfg['variance'] 是解码过程中使用的方差。
  boxes = boxes * scale / resize #对解码后的边框进行缩放,使其与原图的大小一致。scale 是之前定义的缩放比例张量,resize 是缩放因子,这里为1。
  boxes = boxes.cpu().numpy() #将解码后的边框转换为 NumPy 数组
  #提取置信度
  scores = conf[0][:, 1] #提取了每个预测框的置信度分数
  #解码关键点预测
  landms = decode_landm(torch.tensor(landms[0]), torch.tensor(prior_data), cfg['variance'])
  scale1 = torch.Tensor([img_shape[3], img_shape[2], img_shape[3], img_shape[2],
                        img_shape[3], img_shape[2], img_shape[3], img_shape[2],
                        img_shape[3], img_shape[2]])
  landms = landms * scale1 / resize
  landms = landms.cpu().numpy()
  return boxes, scores, landms
# 过滤检测框
def filter_boxes(boxes, scores, landms, confidence_threshold, nms_threshold):
  # 将 PyTorch 张量转换为 NumPy 数组(这里有修改,和原来的代码不一样)
  scores = scores.detach().cpu().numpy()
  # 过滤低置信度检测结果
  inds = np.where(scores > confidence_threshold)[0]
  boxes = boxes[inds] #保留置信度高于阈值的边框
  landms = landms[inds] #保留置信度高于阈值的关键点
  scores = scores[inds] #保留置信度高于阈值的置信度分数
  # 按置信度排序
  order = scores.argsort()[::-1] #[::-1] 表示从高到低排序。
  boxes = boxes[order] #按排序后的索引重新排列边框
  landms = landms[order] #按排序后的索引重新排列关键点
  scores = scores[order] #按排序后的索引重新排列置信度分数
  # 将边框和置信度分数水平堆叠在一起,形成一个新的数组 dets。scores[:, np.newaxis] 将置信度分数转换为列向量。
  dets = np.hstack((boxes, scores[:, np.newaxis], landms)).astype(np.float32, copy=False)
  # 使用 NMS 算法去除重叠的检测框。nms_threshold 是 NMS 的阈值,py_cpu_nms 是一个实现 NMS 的函数。keep 是保留下来的检测框的索引。
  keep = py_cpu_nms(dets[:, :5], nms_threshold)
  dets = dets[keep, :] #保留 NMS 后的检测框
  landms = landms[keep] #保留 NMS 后的关键点
  return dets
# 在图上绘制检测结果
def draw_detection(image, dets, save_path, vis_thres=0.6):
  # 绘制检测结果(可能多张人脸)
  for i, b in enumerate(dets):
      if b[4] < vis_thres: #只展示高置信度人脸
          continue
      text = "{:.4f}".format(b[4])
      b = list(map(int, b))
      #绘制人脸边框
      cv2.rectangle(image, (b[0], b[1]), (b[2], b[3]), (0, 0, 255), 5)
      cx = b[0]
      cy = b[1] + 12
      #写上置信度
      cv2.putText(image, text, (cx, cy),
                  cv2.FONT_HERSHEY_DUPLEX, 0.5, (255, 255, 255))
      # 绘制关键点
      cv2.circle(image, (b[5], b[6]), 3, (0, 0, 255), 8) #1是半径,4是线宽
      cv2.circle(image, (b[7], b[8]), 3, (0, 255, 255), 8)
      cv2.circle(image, (b[9], b[10]), 3, (255, 0, 255), 8)
      cv2.circle(image, (b[11], b[12]), 3, (0, 255, 0), 8)
      cv2.circle(image, (b[13], b[14]), 3, (255, 0, 0), 8)
  # 保存结果图像
  cv2.imwrite(save_path, image)
  print(f"Detection result saved to {save_path}")
#人脸检测,使用Pytorch模型
def check_face_use_pytorch(model, image_path):
  # 加载图片并预处理
  img, img_raw, scale = preprocess
  # 执行Pytorch模型推理
  loc, conf, landms = inference_pytorch(model, img)
  # 推理结果解码
  boxes, scores, landms = decode_results(loc, conf, landms, resize, scale, img.shape)
  # 过滤检测框
  dets = filter_boxes(boxes, scores, landms, confidence_threshold, nms_threshold)
  # 在图像上结果标注并保存
draw_detection(img_raw, dets, save_path, vis_thres)置信度排序:首先,根据每个检测框的置信度(即模型对该框中目标存在的信任程度)进行排序,从高到低排列。
选择最高置信度框:选择置信度最高的检测框作为当前的最佳框。
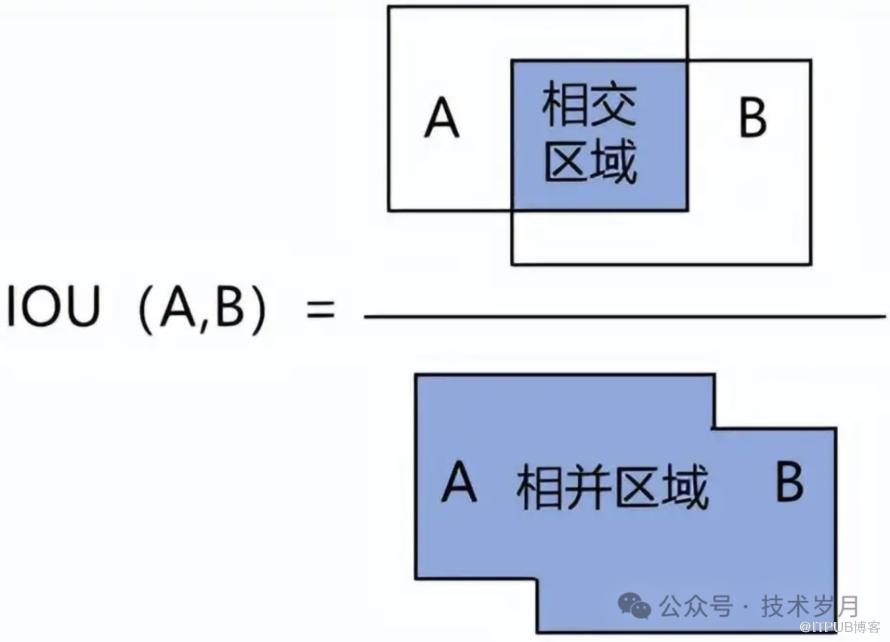
计算重叠度:对于剩下的所有检测框,计算它们与当前最佳框的重叠度。重叠度通常使用交并比来衡量。
抑制重叠框:如果某个检测框与当前最佳框的IoU超过预设的阈值(例如0.5),则认为它们重叠过多,应该被抑制,即从候选框列表中移除。
-
重复过程:从剩下的检测框中再次选择置信度最高的框,重复上述步骤,直到处理完所有框。 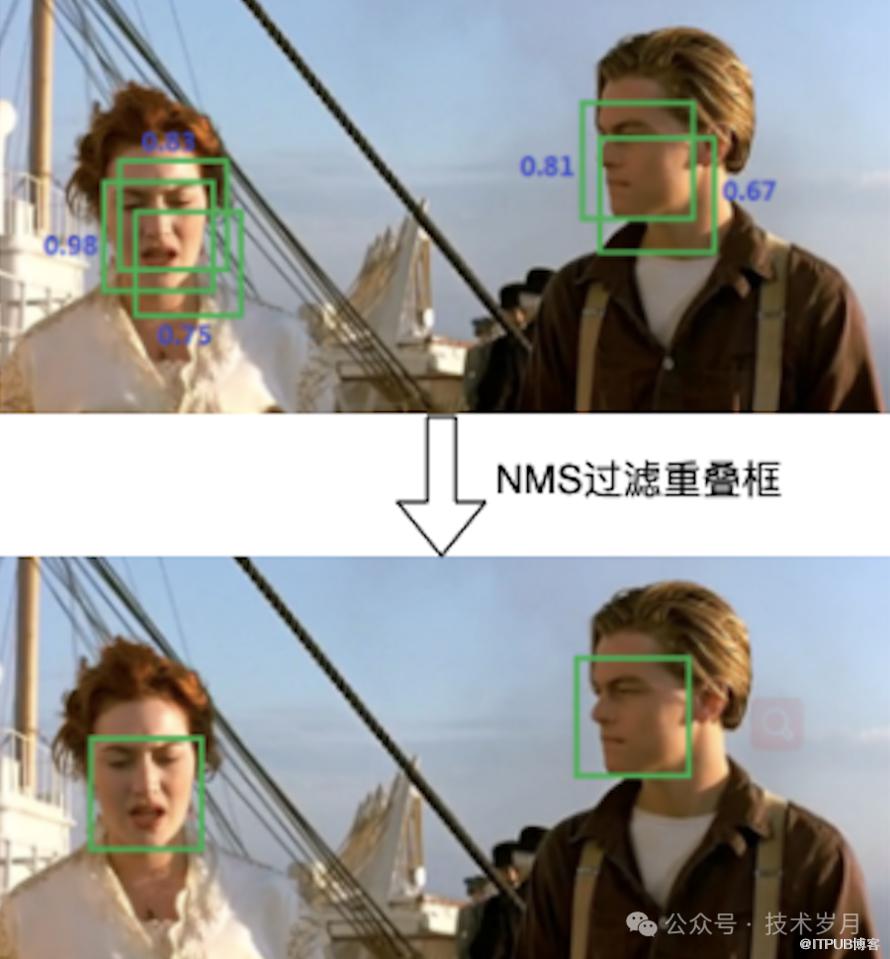
【通过NMS过滤冗余重叠的检测框】
—06—
模型部署与应用
# 创建dummy input,使用任意大小的图像,但批量大小固定为1
dummy_input = torch.randn(1, 3, 480, 640)  # 这个大小只是一个示例
# 导出为ONNX模型,设置动态输入形状
torch.onnx.export(
    model,                   # PyTorch 模型
    dummy_input,             # 示例输入张量
    "path/kavin_face_model.onnx",  # 导出ONNX路径
    verbose=True,            # 是否打印导出过程的详细信息
    input_names=['input'],   # 输入的名字
    output_names=['loc', 'conf', 'landms'], # 输出的名字
    opset_version=11,        # ONNX 的操作集版本
    dynamic_axes={
        'input': {0: 'batch_size', 2: 'height', 3: 'width'},  # 设置动态维度
        'loc': {0: 'batch_size'},  # 批量大小是动态的
        'conf': {0: 'batch_size'},  # 批量大小是动态的
        'landms': {0: 'batch_size'}  # 批量大小是动态的
    }
)
print("ONNX模型导出成功")
▌验证ONNX模型
!pip install onnx onnxruntimeimport onnx# 加载 ONNX 模型onnx_model = onnx.load("path/kavin_face_model.onnx")# 检查模型的结构和确定模型的正确性,输出None表示符合ONNX规范print(onnx.checker.check_model(onnx_model))
import onnxruntime as ort
# 加载 ONNX 模型
onnx_model_path = "/path/kavin_face_model.onnx"
ort_session = ort.InferenceSession(onnx_model_path)
# 打印模型输入名称和形状
input_name = ort_session.get_inputs()[0].name
print(f"Input name: {input_name}")
print("Input shape:", ort_session.get_inputs()[0].shape)
# 打印模型输出名称和形状
output_names = [output.name for output in ort_session.get_outputs()]
for output_name in output_names:
    print(f"Output name: {output_name}")
    print("Output shape:", ort_session.get_outputs()[output_names.index(output_name)].shape)
输出结果如下,可以看到入参批处理数,图片高度,宽度,出参包括人脸位置loc,置信度conf,关键点landms。
import onnxruntime as ort
# 加载 ONNX 模型
onnx_model_path = "model_repository/kavin_face_model/1/model.onnx"
ort_session = ort.InferenceSession(onnx_model_path)

# 执行ONNX模型推理
def inference_onnx(ort_session, img):
  # 前向传播
  input_name = ort_session.get_inputs()[0].name #获取输入名称
  loc, conf, landms = ort_session.run(None, {input_name: img}) #使用 ONNX Runtime 进行模型推理,第一个参数 None 表示我们要获取模型的所有输出,第二个参数是一个字典,键是输入名称,值是输入数据。
  # loc:位置预测(bounding box location predictions)
  # conf:置信度(confidence scores)
  # landms:关键点(landmark predictions)
  print("loc shape:", loc.shape)
  print("conf shape:", conf.shape)
  print("landms shape:", landms.shape)
  return loc, conf, landms
#人脸检测,使用ONNX模型
def check_face_use_onnx(ort_session, image_path):
  # 加载图片并预处理
  img, img_raw, scale = preprocess_image(image_path)
  # 执行ONNX模型推理
  loc, conf, landms = inference_onnx(ort_session, img)
  # 解码结果,过滤,在图上标注并保存
  # ...同上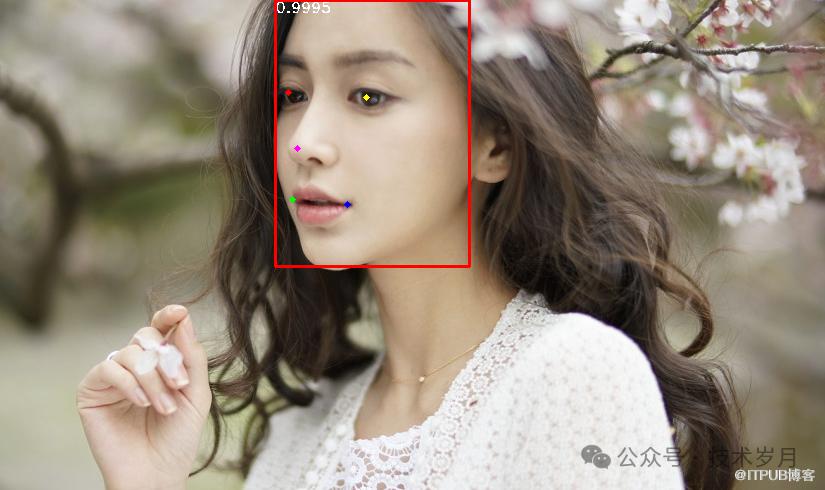
【使用ONNX模型推理并绘制结果】
官方文档链接:
https://docs.nvidia.com/deeplearning/triton-inference-server/user-guide/docs/getting_started/quickstart.html
Triton Inference Server 可以使用 Docker 轻松完成部署,简化了环境配置和管理过程。它支持 RESTful 和 gRPC 等多种接口调用方式,方便用户根据不同需求进行集成和访问。其架构图下图所示。
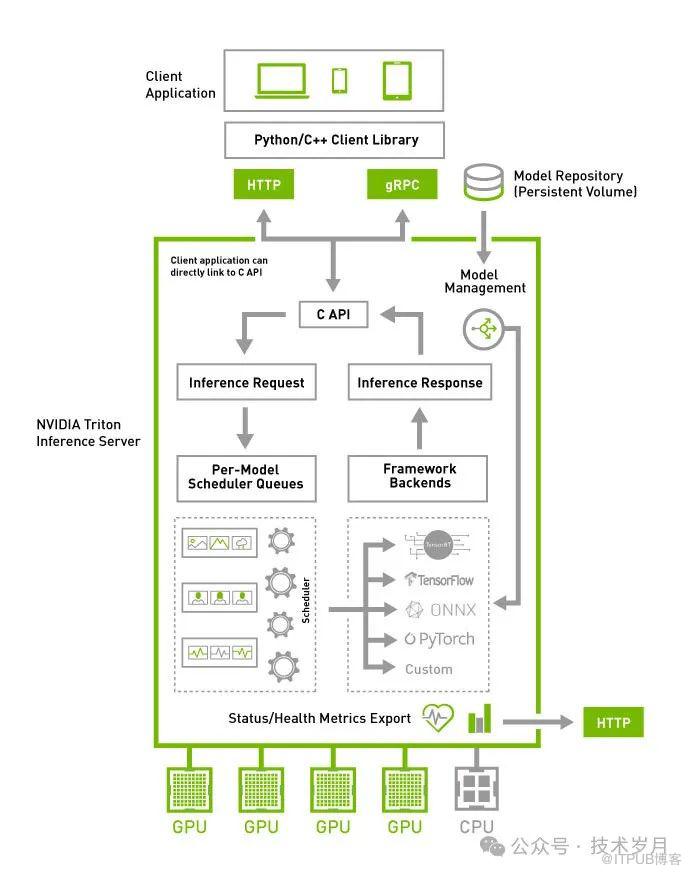
【Triton Inference Server架构】
name: "kavin_face_model"
platform: "onnxruntime_onnx"
max_batch_size: 1
input [
  {
    name: "input"
    data_type: TYPE_FP32
    dims: [3, -1, -1]
  }
]
output [
  {
    name: "loc"
    data_type: TYPE_FP32
    dims: [-1, 4]
  },
  {
    name: "conf"
    data_type: TYPE_FP32
    dims: [-1, 2]
  },
  {
    name: "landms"
    data_type: TYPE_FP32
    dims: [-1, 10]
  }
]
instance_group [
  {
    count: 1
    kind: KIND_CPU
  }
]
model_repository/└── kavin_face_model/├── 1/│ └── model.onnx└── config.pbtxt
docker run --name kavin_face_server -p 8000:8000 -p 8001:8001 -p 8002:8002 \-v $(pwd)/model_repository:/models \-d nvcr.io/nvidia/tritonserver:24.07-py3 tritonserver --model-repository=/models
--name kavin_face_server:容器名
-p 8001:8001:映射 gRPC API 端口
-p 8002:8002:映射 Prometheus 端口,用于监控
-v $(pwd)/model_repository:/models:挂载模型到容器,注意路径问题nvcr.io/nvidia/tritonserver:24.07-py3 tritonserver --model-repository=/models :启动服务并指定模型存储目录
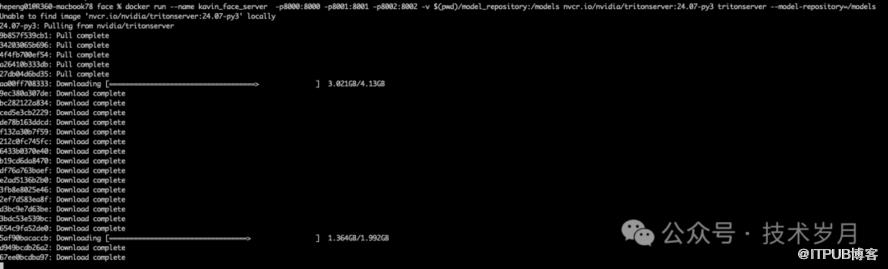
docker logs kavin_face_serverdocker ps -a
+------------------+---------+--------+
| Model | Version | Status |
+------------------+---------+--------+
| kavin_face_model | 1 | READY |
▌部署集群
version: '3.8'
services:
  kavin_face_server:
    image: nvcr.io/nvidia/tritonserver:24.07-py3
    container_name: kavin_face_server
    ports:
      - "8000:8000"
      - "8001:8001"
      - "8002:8002"
    volumes:
      - ./model_repository:/models
    command: tritonserver --model-repository=/models
    deploy:
      replicas: 3  # 设置为3个实例来创建一个集群
      resources:
        limits:
          cpus: '1'
          memory: 2G
    restart: always
状态检查接口:正常返回200状态,无返回值。
curl -v localhost:8000/v2/health/readycurl -v localhost:8000/v2/models/kavin_face_modelimport requests
def inference_api(img):
# 构造推理请求的JSON结构
infer_request = {
"inputs": [{
"name": "input",
"shape": img.shape,
"datatype": "FP32",
"data": img.flatten().tolist()
}]
}
# 发送推理请求
try:
url = 'http://localhost:8000/v2/models/kavin_face_model/infer'
response = requests.post(url, json=infer_request)
result = response.json()
if response.status_code != 200:
raise Exception(result)
except Exception as e:
print("Error in inference request:", e)
return
# 解析推理结果,注意这里的返回值顺序
conf = np.array(result['outputs'][0]['data']).reshape(result['outputs'][0]['shape'])
landms = np.array(result['outputs'][1]['data']).reshape(result['outputs'][1]['shape'])
loc = np.array(result['outputs'][2]['data']).reshape(result['outputs'][2]['shape'])
return loc, conf, landms
#人脸检测,使用API
def check_face_use_api(image_path):
# 加载图片并预处理
img, img_raw, scale = preprocess_image(image_path)
# 执行API推理
loc, conf, landms = inference_api(img)
# 解码结果,过滤,在图上标注并保存
# ...同上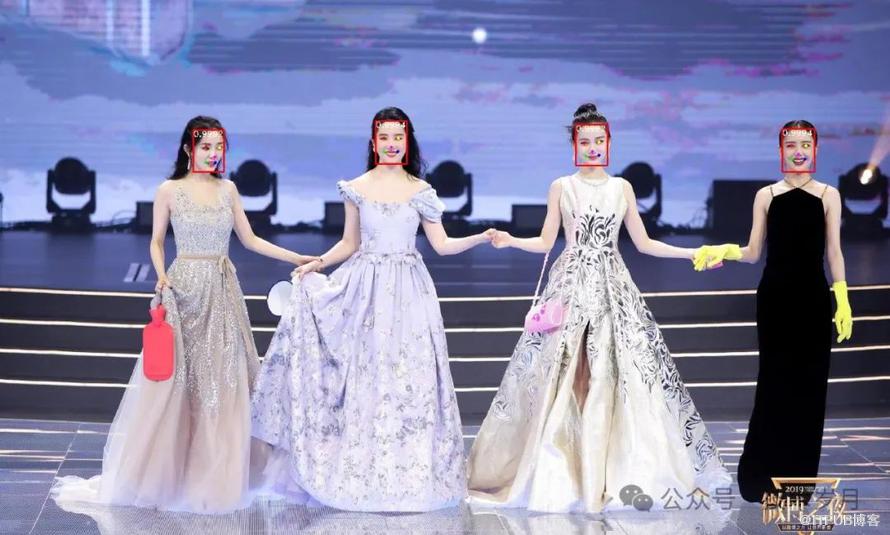
【使用Triton Inference Server API执行模型推理并绘制结果】
▌封装推理服务
一般对外提供服务时,可以使用Python或Java在外面再封装一层API,增加对入参的检测,出参结果的封装(封装成01介绍的接口格式)。为了保障性能,可以通过gRPC来调用Triton Inference Server接口进行推理。这部分并不复杂就不展开赘述了,具体可以参看代码。
—07—
总结
本文围绕人脸检测任务展开,详细介绍了模型使用的数据集,算法,模型训练和评估过程。然后通过具体示例演示了使用模型检测图片上的人脸以及标注后的效果。最后介绍了模型在生产环境如何部署和使用,可以说完整的带你了解了人脸检测的落地过程。当然实际应用过程还有一些细节需要考虑,根据不同的场景也有一些注意和调整的地方。大家在使用过程中有任何问题欢迎与我交流讨论。
[3] Yang S, Luo P, Loy C C, et al. Wider face: A face detection benchmark[C]//Proceedings of the IEEE conference on computer vision and pattern recognition. 2016: 5525-5533.
[4] Zhang K, Zhang Z, Li Z, et al. Joint face detection and alignment using multitask cascaded convolutional networks[J]. IEEE signal processing letters, 2016, 23(10): 1499-1503.
[5] Deng J, Guo J, Zhou Y, et al. Retinaface: Single-stage dense face localisation in the wild[J]. arXiv preprint arXiv:1905.00641, 2019.
[6] Howard A G, Zhu M, Chen B, et al. Mobilenets: Efficient convolutional neural networks for mobile vision applications[J]. arXiv preprint arXiv:1704.04861, 2017.
[7] He K, Zhang X, Ren S, et al. Deep residual learning for image recognition[C]//Proceedings of the IEEE conference on computer vision and pattern recognition. 2016: 770-778.
[8] Wang F, Chen L, Li C, et al. The devil of face recognition is in the noise[C]//Proceedings of the European Conference on Computer Vision (ECCV). 2018: 765-780.
[9] Wu W, Peng H, Yu S. Yunet: A tiny millisecond-level face detector[J]. Machine Intelligence Research, 2023, 20(5): 656-665.
本文涉及代码请在“技术岁月”后台发送关键字“人脸检测代码”获取,涉及论文发送关键字“人脸论文”获取。
如果觉得文章还行,请一定要点赞支持哦,拜托了!最后感谢您的阅读~