前言
一、环境准备
二、iscsi安装与配置
三、cman与rgmanager集群安装与配置
四、cLVM安装与配置
五、gfs2安装与配置
六、测试
前言
前面的几篇文章中我们一直在讲解高可用集群,但一直没有讲解共享存储,我们又说共享存储是十分重要的,在这一篇博文中我们重点来讲一下共享存储,与前面的文章有所不同的是在这一篇文章中我们重点讲解的是具体操作,理论知识不做重点说明,至于什么是RHCS集群套件、什么是iscsi,大家可以到网上去搜索一下,全都是我在这里就不重点说明。但有一点我得说明一下,有博友会说了现在共享存储不是NAS就是SAN,你这个应用范围也太小了吧,但我想说是,企业级的NAS或都SAN设备动不动就是几十万或都上百万(我这里说少了),不是什么公司都能承受的(毕竟大公司也就那几个),对于中小型企业来说,我们不想用NAS或者SAN但我们又想用共享存储,性能上不是要求太高,我想这种方案还个不错的选择。好了,引子就说到这里,下面我们来具体演示一下,这种共享存储的实现。
一、环境准备
1.操作系统
CentOS 6.4 X86_64
2.软件版本
scsi-target-utils-1.0.24-3.el6_4.x86_64
iscsi-initiator-utils-6.2.0.873-2.el6.x86_64
cman-3.0.12.1-49.el6_4.1.x86_64
rgmanager-3.0.12.1-17.el6.x86_64
gfs2-utils-3.0.12.1-49.el6_4.1.x86_64
lvm2-cluster-2.02.98-9.el6.x86_64
3.实验拓扑
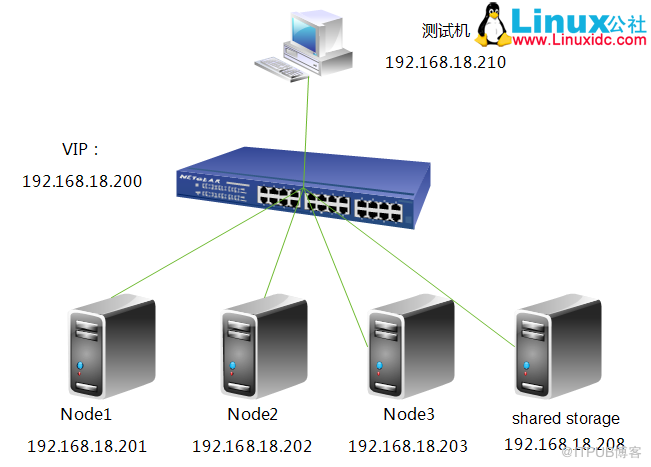
简单说明:RHCS集群套件,要求节点最少得3个。所以这里有3个集群节点和一个共享存储。(注,shared storage不但是共享存储,还是跳板机,且shared storage的主机名是target.test.com)
4.集群环境
(1).配置各节点名称
node1:
[root@node1 ~]# uname -n
node1.test.com
[root@node1 ~]# cat /etc/hosts
127.0.0.1 localhost localhost.localdomain localhost4 localhost4.localdomain4
::1 localhost localhost.localdomain localhost6 localhost6.localdomain6
192.168.18.201 node1.test.com node1
192.168.18.202 node2.test.com node2
192.168.18.203 node3.test.com node3
192.168.18.208 target.test.com target
node2:
[root@node2 ~]# uname -n
node2.test.com
[root@node2 ~]# cat /etc/hosts
127.0.0.1 localhost localhost.localdomain localhost4 localhost4.localdomain4
::1 localhost localhost.localdomain localhost6 localhost6.localdomain6
192.168.18.201 node1.test.com node1
192.168.18.202 node2.test.com node2
192.168.18.203 node3.test.com node3
192.168.18.208 target.test.com target
node3:
[root@node3 ~]# uname -n
node3.test.com
[root@node3 ~]# cat /etc/hosts
127.0.0.1 localhost localhost.localdomain localhost4 localhost4.localdomain4
::1 localhost localhost.localdomain localhost6 localhost6.localdomain6
192.168.18.201 node1.test.com node1
192.168.18.202 node2.test.com node2
192.168.18.203 node3.test.com node3
192.168.18.208 target.test.com target
shared storage:
[root@target ~]# uname -n
target.test.com
[root@target ~]# cat /etc/hosts
127.0.0.1 localhost localhost.localdomain localhost4 localhost4.localdomain4
::1 localhost localhost.localdomain localhost6 localhost6.localdomain6
192.168.18.201 node1.test.com node1
192.168.18.202 node2.test.com node2
192.168.18.203 node3.test.com node3
192.168.18.208 target.test.com target
(2).配置各节点与跳板机ssh互信
node1:
[root@node1 ~]# ssh-keygen -t rsa -f ~/.ssh/id_rsa -P ''
[root@node1 ~]# ssh-copy-id -i .ssh/id_rsa.pub root@target.test.com
node2:
[root@node2 ~]# ssh-keygen -t rsa -f ~/.ssh/id_rsa -P ''
[root@node2 ~]# ssh-copy-id -i .ssh/id_rsa.pub root@target.test.com
node3:
[root@node3 ~]# ssh-keygen -t rsa -f ~/.ssh/id_rsa -P ''
[root@node3 ~]# ssh-copy-id -i .ssh/id_rsa.pub root@target.test.com
shared storage:
[root@target ~]# ssh-keygen -t rsa -f ~/.ssh/id_rsa -P ''
[root@target ~]# ssh-copy-id -i .ssh/id_rsa.pub root@node1.test.com
[root@target ~]# ssh-copy-id -i .ssh/id_rsa.pub root@node2.test.com
[root@target ~]# ssh-copy-id -i .ssh/id_rsa.pub root@node3.test.com
(3).配置各节点时间同步
node1:
[root@node1 ~]# ntpdate 202.120.2.101
node2:
[root@node2 ~]# ntpdate 202.120.2.101
node3:
[root@node3 ~]# ntpdate 202.120.2.101
shared storage:
[root@target ~]# ntpdate 202.120.2.101
大家有没有发现我们时间同步的操作包括下面的很操作都是相同的有没有一种方法,只要执行一次,方法有很多,我们来说一下最常用的方法:ssh。在上面的操作中我们已经配置了ssh互信,下面我们就在跳板机上操作一下。
[root@target ~]# alias ha='for I in {1..3}; do' #设置一个别名,因为每次都得用到时
[root@target ~]# ha ssh node$I 'ntpdate 202.120.2.101'; done #各节点都在时间同步
20 Aug 14:32:40 ntpdate[14752]: adjust time server 202.120.2.101 offset -0.019162 sec
20 Aug 14:32:41 ntpdate[11994]: adjust time server 202.120.2.101 offset 0.058863 sec
20 Aug 14:32:43 ntpdate[1578]: adjust time server 202.120.2.101 offset 0.062831 sec
注:大家看到了吧,这就是配置跳板机的好处,配置只要执行一次。
(5).安装yum源
[root@target ~]# ha ssh node$I 'rpm -ivh http://download.Fedoraproject.org/pub/epel/6/x86_64/epel-release-6-8.noarch.rpm'; done
[root@target ~]# ha ssh node$I 'rpm -ivh http://elrepo.org/elrepo-release-6-5.el6.elrepo.noarch.rpm'; done
(6).关闭防火墙与SELinux
[root@target ~]# ha ssh node$I 'service iptables stop'; done
node1:
[root@node1 ~]# cat /etc/selinux/config
# This file controls the state of SELinux on the system.
# SELINUX= can take one of these three values:
# enforcing - SELinux security policy is enforced.
# permissive - SELinux prints warnings instead of enforcing.
# disabled - No SELinux policy is loaded.
SELINUX=disabled
# SELINUXTYPE= can take one of these two values:
# targeted - Targeted processes are protected,
# mls - Multi Level Security protection.
SELINUXTYPE=targeted
node2:
[root@node2 ~]# cat /etc/selinux/config
# This file controls the state of SELinux on the system.
# SELINUX= can take one of these three values:
# enforcing - SELinux security policy is enforced.
# permissive - SELinux prints warnings instead of enforcing.
# disabled - No SELinux policy is loaded.
SELINUX=disabled
# SELINUXTYPE= can take one of these two values:
# targeted - Targeted processes are protected,
# mls - Multi Level Security protection.
SELINUXTYPE=targeted
node3:
[root@node3 ~]# cat /etc/selinux/config
# This file controls the state of SELinux on the system.
# SELINUX= can take one of these three values:
# enforcing - SELinux security policy is enforced.
# permissive - SELinux prints warnings instead of enforcing.
# disabled - No SELinux policy is loaded.
SELINUX=disabled
# SELINUXTYPE= can take one of these two values:
# targeted - Targeted processes are protected,
# mls - Multi Level Security protection.
SELINUXTYPE=targeted
好了,环境准备全部完成,下面我们来配置一下iscsi。 见 http://www.linuxidc.com/Linux/2013-08/89166p2.htm
二、iscsi 安装与配置
1.安装target
[root@target ~]# yum install -y scsi-target-utils
2.配置target
[root@target ~]# vim /etc/tgt/targets.conf
#
# direct-store /dev/sdd
# incominguser someuser secretpass12
#
#配置target名称
#配置共享磁盘
vendor_id test #配置发行商(任意)
lun 6 #配置LUN号
incominguser iscsiuser iscsiuser #配置认证的用户名和密码
initiator-address 192.168.18.0/24 #配置允许的网段
3.启动target并设置为开机自启动
[root@target ~]# service tgtd start
[root@target ~]# chkconfig tgtd on
[root@target ~]# chkconfig tgtd --list
tgtd 0:关闭 1:关闭 2:启用 3:启用 4:启用 5:启用 6:关闭
4.查看配置的target
[root@target ~]# tgtadm --lld iscsi --mode target --op show
Target 1: iqn.2013-08.com.test:teststore.sdb
System information:
Driver: iscsi
State: ready
I_T nexus information:
LUN information:
LUN: 0
Type: controller
SCSI ID: IET 00010000
SCSI SN: beaf10
Size: 0 MB, Block size: 1
Online: Yes
Removable media: No
Prevent removal: No
Readonly: No
Backing store type: null
Backing store path: None
Backing store flags:
Account information:
iscsiuser
ACL information:
192.168.18.0/24
5.在各节点上安装initiator
[root@target ~]# ha ssh node$I 'yum install -y initiator'; done
6.配置initiator
node1:
[root@node1 ~]# vim /etc/iscsi/initiatorname.iscsi
InitiatorName=iqn.2013-08.com.test:node1
[root@node1 ~]# vim /etc/iscsi/iscsid.conf
#修改下面三项
node.session.auth.authmethod = CHAP #开启CHAP认证
node.session.auth.username = iscsiuser #配置认证用户名
node.session.auth.password = iscsiuser #配置认证密码
node2:
[root@node2 ~]# vim /etc/iscsi/initiatorname.iscsi
InitiatorName=iqn.2013-08.com.test:node2
[root@node2~]# vim /etc/iscsi/iscsid.conf
#修改下面三项
node.session.auth.authmethod = CHAP #开启CHAP认证
node.session.auth.username = iscsiuser #配置认证用户名
node.session.auth.password = iscsiuser #配置认证密码
node3:
[root@node3 ~]# vim /etc/iscsi/initiatorname.iscsi
InitiatorName=iqn.2013-08.com.test:node3
[root@node3 ~]# vim /etc/iscsi/iscsid.conf
#修改下面三项
node.session.auth.authmethod = CHAP #开启CHAP认证
node.session.auth.username = iscsiuser #配置认证用户名
node.session.auth.password = iscsiuser #配置认证密码
7.各节点启动initiator并设置为开机自启动
[root@target ~]# ha ssh node$I 'service iscsi start'; done
[root@target ~]# ha ssh node$I 'chkconfig iscsi on'; done
[root@target ~]# ha ssh node$I 'chkconfig iscsi --list'; done
iscsi 0:关闭 1:关闭 2:启用 3:启用 4:启用 5:启用 6:关闭
iscsi 0:关闭 1:关闭 2:启用 3:启用 4:启用 5:启用 6:关闭
iscsi 0:关闭 1:关闭 2:启用 3:启用 4:启用 5:启用 6:关闭
8.在各节点上发现一下target
[root@target ~]# ha ssh node$I 'iscsiadm -m discovery -t st -p 192.168.18.208:3260'; done
192.168.18.208:3260,1 iqn.2013-08.com.test:teststore.sdb
192.168.18.208:3260,1 iqn.2013-08.com.test:teststore.sdb
192.168.18.208:3260,1 iqn.2013-08.com.test:teststore.sdb
9.各节点登录一下target并查看一下磁盘
[root@target ~]# ha ssh node$I 'iscsiadm -m node -T iqn.2013-08.com.test:teststore.sdb -p 192.168.18.208 -l'; done
[root@target ~]# ha ssh node$I 'fdisk -l'; done
Disk /dev/sda: 21.5 GB, 21474836480 bytes
255 heads, 63 sectors/track, 2610 cylinders
Units = cylinders of 16065 * 512 = 8225280 bytes
Sector size (logical/physical): 512 bytes / 512 bytes
I/O size (minimum/optimal): 512 bytes / 512 bytes
Disk identifier: 0x000dfceb
Device Boot Start End Blocks Id System
/dev/sda1 * 1 26 204800 83 Linux
Partition 1 does not end on cylinder boundary.
/dev/sda2 26 1301 10240000 83 Linux
/dev/sda3 1301 1938 5120000 83 Linux
/dev/sda4 1938 2611 5405696 5 Extended
/dev/sda5 1939 2066 1024000 82 Linux swap / Solaris
Disk /dev/sdb: 21.5 GB, 21474836480 bytes
255 heads, 63 sectors/track, 2610 cylinders
Units = cylinders of 16065 * 512 = 8225280 bytes
Sector size (logical/physical): 512 bytes / 512 bytes
I/O size (minimum/optimal): 512 bytes / 512 bytes
Disk identifier: 0x5f3b697c
Device Boot Start End Blocks Id System
Disk /dev/sdd: 21.5 GB, 21474836480 bytes
64 heads, 32 sectors/track, 20480 cylinders
Units = cylinders of 2048 * 512 = 1048576 bytes
Sector size (logical/physical): 512 bytes / 512 bytes
I/O size (minimum/optimal): 512 bytes / 512 bytes
Disk identifier: 0x0c68b5e3
Device Boot Start End Blocks Id System
Disk /dev/sda: 21.5 GB, 21474836480 bytes
255 heads, 63 sectors/track, 2610 cylinders
Units = cylinders of 16065 * 512 = 8225280 bytes
Sector size (logical/physical): 512 bytes / 512 bytes
I/O size (minimum/optimal): 512 bytes / 512 bytes
Disk identifier: 0x000dfceb
Device Boot Start End Blocks Id System
/dev/sda1 * 1 26 204800 83 Linux
Partition 1 does not end on cylinder boundary.
/dev/sda2 26 1301 10240000 83 Linux
/dev/sda3 1301 1938 5120000 83 Linux
/dev/sda4 1938 2611 5405696 5 Extended
/dev/sda5 1939 2066 1024000 82 Linux swap / Solaris
Disk /dev/sdb: 21.5 GB, 21474836480 bytes
255 heads, 63 sectors/track, 2610 cylinders
Units = cylinders of 16065 * 512 = 8225280 bytes
Sector size (logical/physical): 512 bytes / 512 bytes
I/O size (minimum/optimal): 512 bytes / 512 bytes
Disk identifier: 0x00000000
Disk /dev/sdd: 21.5 GB, 21474836480 bytes
64 heads, 32 sectors/track, 20480 cylinders
Units = cylinders of 2048 * 512 = 1048576 bytes
Sector size (logical/physical): 512 bytes / 512 bytes
I/O size (minimum/optimal): 512 bytes / 512 bytes
Disk identifier: 0x0c68b5e3
Device Boot Start End Blocks Id System
好了,到这里iscsi配置全部完成,下面我们来配置一下,集群。
三、cman与rgmanager 集群安装与配置
1.各节点安装cman与rgmanager
[root@target ~]# ha ssh node$I 'yum install -y cman rgmanager'; done
2.配置集群
(1).配置集群名称
[root@node1 ~]# ccs_tool create testcluster
(2).配置fencing设备
[root@node1 ~]# ccs_tool addfence meatware fence_manual
[root@node1 ~]# ccs_tool lsfence
Name Agent
meatware fence_manual
(3).配置集群节点
[root@node1 ~]# ccs_tool addnode -n 1 -f meatware node1.test.com
[root@node1 ~]# ccs_tool addnode -n 2 -f meatware node2.test.com
[root@node1 ~]# ccs_tool addnode -n 3 -f meatware node3.test.com
[root@node1 ~]# ccs_tool lsnode
Cluster name: testcluster, config_version: 5
Nodename Votes Nodeid Fencetype
node1.test.com 1 1 meatware
node2.test.com 1 2 meatware
node3.test.com 1 3 meatware
3.同步配置文件到各节点
[root@node1 cluster]# scp cluster.conf root@node2.test.com:/etc/cluster/
[root@node1 cluster]# scp cluster.conf root@node3.test.com:/etc/cluster/
4.启动各节点集群
node1:
[root@node1 cluster]# service cman start
Starting cluster:
Checking if cluster has been disabled at boot... [确定]
Checking Network Manager... [确定]
Global setup... [确定]
Loading kernel modules... [确定]
Mounting configfs... [确定]
Starting cman... [确定]
Waiting for quorum... [确定]
Starting fenced... [确定]
Starting dlm_controld... [确定]
Tuning DLM kernel config... [确定]
Starting gfs_controld... [确定]
Unfencing self... [确定]
Joining fence domain... [确定]
node2:
[root@node2 cluster]# service cman start
Starting cluster:
Checking if cluster has been disabled at boot... [确定]
Checking Network Manager... [确定]
Global setup... [确定]
Loading kernel modules... [确定]
Mounting configfs... [确定]
Starting cman... [确定]
Waiting for quorum... [确定]
Starting fenced... [确定]
Starting dlm_controld... [确定]
Tuning DLM kernel config... [确定]
Starting gfs_controld... [确定]
Unfencing self... [确定]
Joining fence domain... [确定]
node3:
[root@node3 cluster]# service cman start
Starting cluster:
Checking if cluster has been disabled at boot... [确定]
Checking Network Manager... [确定]
Global setup... [确定]
Loading kernel modules... [确定]
Mounting configfs... [确定]
Starting cman... [确定]
Waiting for quorum... [确定]
Starting fenced... [确定]
Starting dlm_controld... [确定]
Tuning DLM kernel config... [确定]
Starting gfs_controld... [确定]
Unfencing self... [确定]
Joining fence domain... [确定]
5.查看各节点启动端口
node1:
[root@node1 cluster]# netstat -ntulp
Active Internet connections (only servers)
Proto Recv-Q Send-Q Local Address Foreign Address State PID/Program name
tcp 0 0 0.0.0.0:22 0.0.0.0:* LISTEN 1082/sshd
tcp 0 0 127.0.0.1:25 0.0.0.0:* LISTEN 1158/master
tcp 0 0 127.0.0.1:6010 0.0.0.0:* LISTEN 14610/sshd
tcp 0 0 :::22 :::* LISTEN 1082/sshd
tcp 0 0 ::1:25 :::* LISTEN 1158/master
tcp 0 0 ::1:6010 :::* LISTEN 14610/sshd
udp 0 0 192.168.18.201:5404 0.0.0.0:* 15583/corosync
udp 0 0 192.168.18.201:5405 0.0.0.0:* 15583/corosync
udp 0 0 239.192.47.48:5405 0.0.0.0:* 15583/corosync
node2:
[root@node2 cluster]# netstat -ntulp
Active Internet connections (only servers)
Proto Recv-Q Send-Q Local Address Foreign Address State PID/Program name
tcp 0 0 0.0.0.0:22 0.0.0.0:* LISTEN 1082/sshd
tcp 0 0 127.0.0.1:25 0.0.0.0:* LISTEN 1158/master
tcp 0 0 127.0.0.1:6010 0.0.0.0:* LISTEN 14610/sshd
tcp 0 0 :::22 :::* LISTEN 1082/sshd
tcp 0 0 ::1:25 :::* LISTEN 1158/master
tcp 0 0 ::1:6010 :::* LISTEN 14610/sshd
udp 0 0 192.168.18.201:5404 0.0.0.0:* 15583/corosync
udp 0 0 192.168.18.201:5405 0.0.0.0:* 15583/corosync
udp 0 0 239.192.47.48:5405 0.0.0.0:* 15583/corosync
node3:
[root@node3 cluster]# netstat -ntulp
Active Internet connections (only servers)
Proto Recv-Q Send-Q Local Address Foreign Address State PID/Program name
tcp 0 0 0.0.0.0:22 0.0.0.0:* LISTEN 1082/sshd
tcp 0 0 127.0.0.1:25 0.0.0.0:* LISTEN 1158/master
tcp 0 0 127.0.0.1:6010 0.0.0.0:* LISTEN 14610/sshd
tcp 0 0 :::22 :::* LISTEN 1082/sshd
tcp 0 0 ::1:25 :::* LISTEN 1158/master
tcp 0 0 ::1:6010 :::* LISTEN 14610/sshd
udp 0 0 192.168.18.201:5404 0.0.0.0:* 15583/corosync
udp 0 0 192.168.18.201:5405 0.0.0.0:* 15583/corosync
udp 0 0 239.192.47.48:5405 0.0.0.0:* 15583/corosync
好了,到此集群配置完成,下面我们来配置cLVM。
四、cLVM 安装与配置
1.安装cLVM
[root@target ~]# ha ssh node$I 'yum install -y lvm2-cluster'; done
2.启用集群LVM
[root@target ~]# ha ssh node$I 'lvmconf --enable-cluster'; done
3.查看一下启用的集群LVM
[root@target ~]# ha ssh node$I 'grep "locking_type = 3" /etc/lvm/lvm.conf'; done
locking_type = 3
locking_type = 3
locking_type = 3
注:所有节点启用完成。
4.启动cLVM服务
[root@target ~]# ha ssh node$I 'service clvmd start'; done
Starting clvmd:
Activating VG(s): No volume groups found
[确定]
Starting clvmd:
Activating VG(s): No volume groups found
[确定]
Starting clvmd:
Activating VG(s): No volume groups found
[确定]
5.将各节点的cman rgmanger clvmd设置为开机自启动
[root@target ~]# ha ssh node$I 'chkconfig clvmd on'; done
[root@target ~]# ha ssh node$I 'chkconfig cman on'; done
[root@target ~]# ha ssh node$I 'chkconfig rgmanager on'; done
6.在集群节点上创建lvm
node1:
(1).查看一下共享存储
[root@node1 ~]# fdisk -l #查看一下共享存储
Disk /dev/sda: 21.5 GB, 21474836480 bytes
255 heads, 63 sectors/track, 2610 cylinders
Units = cylinders of 16065 * 512 = 8225280 bytes
Sector size (logical/physical): 512 bytes / 512 bytes
I/O size (minimum/optimal): 512 bytes / 512 bytes
Disk identifier: 0x000dfceb
Device Boot Start End Blocks Id System
/dev/sda1 * 1 26 204800 83 Linux
Partition 1 does not end on cylinder boundary.
/dev/sda2 26 1301 10240000 83 Linux
/dev/sda3 1301 1938 5120000 83 Linux
/dev/sda4 1938 2611 5405696 5 Extended
/dev/sda5 1939 2066 1024000 82 Linux swap / Solaris
Disk /dev/sdb: 21.5 GB, 21474836480 bytes
255 heads, 63 sectors/track, 2610 cylinders
Units = cylinders of 16065 * 512 = 8225280 bytes
Sector size (logical/physical): 512 bytes / 512 bytes
I/O size (minimum/optimal): 512 bytes / 512 bytes
Disk identifier: 0x5f3b697c
Device Boot Start End Blocks Id System
Disk /dev/sdd: 21.5 GB, 21474836480 bytes
64 heads, 32 sectors/track, 20480 cylinders
Units = cylinders of 2048 * 512 = 1048576 bytes
Sector size (logical/physical): 512 bytes / 512 bytes
I/O size (minimum/optimal): 512 bytes / 512 bytes
Disk identifier: 0x0c68b5e3
Device Boot Start End Blocks Id System
(2).创建集群逻辑卷
[root@node1 ~]# pvcreate /dev/sdd #创建物理卷
Physical volume "/dev/sdd" successfully created
[root@node1 ~]# pvs
PV VG Fmt Attr PSize PFree
/dev/sdd lvm2 a-- 20.00g 20.00g
[root@node1 ~]# vgcreate clustervg /dev/sdd #创建卷组
Clustered volume group "clustervg" successfully created
[root@node1 ~]# vgs
VG #PV #LV #SN Attr VSize VFree
clustervg 1 0 0 wz--nc 20.00g 20.00g
[root@node1 ~]# lvcreate -L 10G -n clusterlv clustervg #创建逻辑卷
Logical volume "clusterlv" created
[root@node1 ~]# lvs
LV VG Attr LSize Pool Origin Data% Move Log Cpy%Sync Convert
clusterlv clustervg -wi-a---- 10.00g
7.在node2与node3上查看一下创建的逻辑卷
node2:
[root@node2 ~]# lvs
LV VG Attr LSize Pool Origin Data% Move Log Cpy%Sync Convert
clusterlv clustervg -wi-a---- 10.00g
node3:
[root@node3 ~]# lvs
LV VG Attr LSize Pool Origin Data% Move Log Cpy%Sync Convert
clusterlv clustervg -wi-a---- 10.00g
好了,clvm到这里配置全部完成,下面我们将生成的逻辑卷格式成集群文件系统(gfs)。
五、gfs2 安装与配置
1.安装gfs2
[root@target ~]# ha ssh node$I 'yum install -y gfs2-utils'; done
2.查看一下帮助文件
[root@node1 ~]# mkfs.gfs2 -h
Usage:
mkfs.gfs2 [options] [ block-count ]
Options:
-b Filesystem block size
-c Size of quota change file
-D Enable debugging code
-h Print this help, then exit
-J Size of journals
-j Number of journals
-K Don't try to discard unused blocks
-O Don't ask for confirmation
-p Name of the locking protocol
-q Don't print anything
-r Resource Group Size
-t Name of the lock table
-u Size of unlinked file
-V Print program version information, then exit
注:对于我们用到的参数进行说明
-j # 指定日志区域的个数,有几个就能够被几个节点挂载
-J # 指定日志区域的大小,默认为128MB
-p {lock_dlm|lock_nolock}
-t : 锁表的名称,格式为clustername:locktablename
3.格式化为集群文件系统
[root@node1 ~]# mkfs.gfs2 -j 2 -p lock_dlm -t testcluster:sharedstorage /dev/clustervg/clusterlv
This will destroy any data on /dev/clustervg/clusterlv.
It appears to contain: symbolic link to `../dm-0'
Are you sure you want to proceed? [y/n] y
Device: /dev/clustervg/clusterlv
Blocksize: 4096
Device Size 10.00 GB (2621440 blocks)
Filesystem Size: 10.00 GB (2621438 blocks)
Journals: 2
Resource Groups: 40
Locking Protocol: "lock_dlm"
Lock Table: "testcluster:sharedstorage"
UUID: 60825032-b995-1970-2547-e95420bd1c7c
注:testcluster是集群名称,sharedstorage为锁表名称
4.创建挂载目录并挂载
[root@node1 ~]# mkdir /mydata
[root@node1 ~]# mount -t gfs2 /dev/clustervg/clusterlv /mydata
[root@node1 ~]# cd /mydata/
[root@node1 mydata]# ll
总用量 0
5.将node2与node3进行挂载
node2:
[root@node2 ~]# mkdir /mydata
[root@node2 ~]# mount -t gfs2 /dev/clustervg/clusterlv /mydata
[root@node2 ~]# cd /mydata/
[root@node2 mydata]# ll
总用量 0
node3:
[root@node3 ~]# mkdir /mydata
[root@node3 ~]# mount -t gfs2 /dev/clustervg/clusterlv /mydata
Too many nodes mounting filesystem, no free journals
注:可以看到,node2成功挂载而node3没有功功挂载,Too many nodes mounting filesystem, no free journals,没有多于的日志空间。因为我们在格式化时只创建了2个日志文件,所以node1与node2可以挂载,而node3无法挂载,至于怎么解决我们下面会说明。现在我们来测试一下集群文件系统。
六、测试
1.查看是否能快速同步文件
node1:
[root@node1 mydata]# touch 123.txt
[root@node1 mydata]# ll
总用量 4
-rw-r--r-- 1 root root 0 8月 20 16:13 123.txt
[root@node1 mydata]# ll
总用量 8
-rw-r--r-- 1 root root 0 8月 20 16:13 123.txt
-rw-r--r-- 1 root root 0 8月 20 16:14 456.txt
node2:
[root@node2 mydata]# ll
总用量 4
-rw-r--r-- 1 root root 0 8月 20 16:13 123.txt
[root@node2 mydata]# touch 456.txt
[root@node2 mydata]# ll
总用量 8
-rw-r--r-- 1 root root 0 8月 20 16:13 123.txt
-rw-r--r-- 1 root root 0 8月 20 16:14 456.txt
注:我们可以看到文件可以快速同步,下面我们来看一下挂载目录属性
2.查看挂载目录的属性
[root@node1 mydata]# gfs2_tool gettune /mydata
incore_log_blocks = 8192
log_flush_secs = 60
quota_warn_period = 10
quota_quantum = 60
max_readahead = 262144
complain_secs = 10
statfs_slow = 0
quota_simul_sync = 64
statfs_quantum = 30
quota_scale = 1.0000 (1, 1)
new_files_jdata = 0
#最常用,设置是否立刻同步到磁盘的,一般设置为1,下面我们就来设置一下
[root@node1 mydata]# gfs2_tool settune /mydata new_files_jdata 1
[root@node1 mydata]# gfs2_tool gettune /mydata
incore_log_blocks = 8192
log_flush_secs = 60
quota_warn_period = 10
quota_quantum = 60
max_readahead = 262144
complain_secs = 10
statfs_slow = 0
quota_simul_sync = 64
statfs_quantum = 30
quota_scale = 1.0000 (1, 1)
new_files_jdata = 1
3.查看一下日志文件
[root@node1 mydata]# gfs2_tool journals /mydata
journal1 - 128MB
journal0 - 128MB
2 journal(s) found.
注,大家可以看到只有两个日志文件,默认为128MB,下面我们来新增一个日志文件,并将node3挂载上
4.新增日志文件并挂载
[root@node1 ~]# gfs2_jadd -j 1 /dev/clustervg/clusterlv
Filesystem: /mydata
Old Journals 2
New Journals 3
[root@node1 ~]# gfs2_tool journals /mydata
journal2 - 128MB
journal1 - 128MB
journal0 - 128MB
3 journal(s) found.
[root@node3 ~]# mount -t gfs2 /dev/clustervg/clusterlv /mydata
[root@node3 ~]# cd /mydata/
[root@node3 mydata]# ll
总用量 8
-rw-r--r-- 1 root root 0 8月 20 16:13 123.txt
-rw-r--r-- 1 root root 0 8月 20 16:14 456.txt
注,大家可以看到node3顺利挂载上
5.最后和大家说一下怎么扩展集群逻辑卷
(1).先查看一下大小
[root@node3 ~]# lvs
LV VG Attr LSize Pool Origin Data% Move Log Cpy%Sync Convert
clusterlv clustervg -wi-ao--- 10.00g
注,现在是10个G,下面我们将其扩展到15G。
(2).扩展物理边界
[root@node3 ~]# lvextend -L 15G /dev/clustervg/clusterlv
Extending logical volume clusterlv to 15.00 GiB
Logical volume clusterlv successfully resized
[root@node3 ~]# lvs
LV VG Attr LSize Pool Origin Data% Move Log Cpy%Sync Convert
clusterlv clustervg -wi-ao--- 15.00g
(3).扩展逻辑边界
[root@node3 ~]# gfs2_grow /dev/clustervg/clusterlv
FS: Mount Point: /mydata
FS: Device: /dev/dm-0
FS: Size: 2621438 (0x27fffe)
FS: RG size: 65533 (0xfffd)
DEV: Size: 3932160 (0x3c0000)
The file system grew by 5120MB.
gfs2_grow complete.
[root@node3 ~]# df -h
文件系统 容量 已用 可用 已用%% 挂载点
/dev/sda2 9.7G 1.5G 7.7G 17% /
tmpfs 116M 29M 88M 25% /dev/shm
/dev/sda1 194M 26M 159M 14% /boot
/dev/sda3 4.9G 138M 4.5G 3% /data
/dev/sdc1 5.0G 138M 4.6G 3% /mnt
/dev/mapper/clustervg-clusterlv 15G 388M 15G 3% /mydata
可以看到,现在是15G了。好了,CentOS 6.4下基于cman+rgmanager+iscsi+gfs2+cLVM实现廉价的可扩展的集群共享存储的所有演示全部完成,希望大家有所收获。^_^……